Sponsored

Cybergearco Cooler / Fridge / Refrigerator -- DC Install

CT_AZ_4x4

Well-known member
First Name
Jay
Joined
May 22, 2024
Threads
46
Messages
840
Reaction score
1,406
Location
Scottsdale, AZ
Vehicles
AWD CT
Occupation
Self employed
Country flag
The Cybergearco fridge comes with a built-in AC-DC converter as its power source. This converter is in a separate plastic housing that mates with the fridge in the installed position in the center console forward floor. There are a few issues: (1) the Cybertruck shuts off its AC power outlets whenever an AC charging cable is plugged in to the truck; and (2) there are conversion losses when converting DC from the 123kw hour main battery to AC, and then there are additional conversion losses when then converting that AC back to DC.

Forum member (and buddy) Hemiarch and I both had the idea to power the Cybergearco fridge from a solar generator stored in the frunk. He wired his yesterday and his solar generator is providing AC to his Cybergearco fridge in the truck cabin. It’s a great setup and avoids the problem with the Cybertruck shutting off its AC outlets whenever an AC power cable is plugged into the Cybertruck. So the fridge can keep running even when Level 2 charging, for example.

I also wanted to run my fridge from a solar generator stored in the frunk. Hemiarch and I texted about trying to find a male-to-male 12 volt extender cable that would make it easy to run DC from a solar generator located in the frunk to the fridge’s DC input. We couldn’t locate that specific cable anywhere on Amazon or elsewhere. Hemiarch decided to go ahead and install to the solar generator in his frunk, and to just use an AC output on his solar generator.

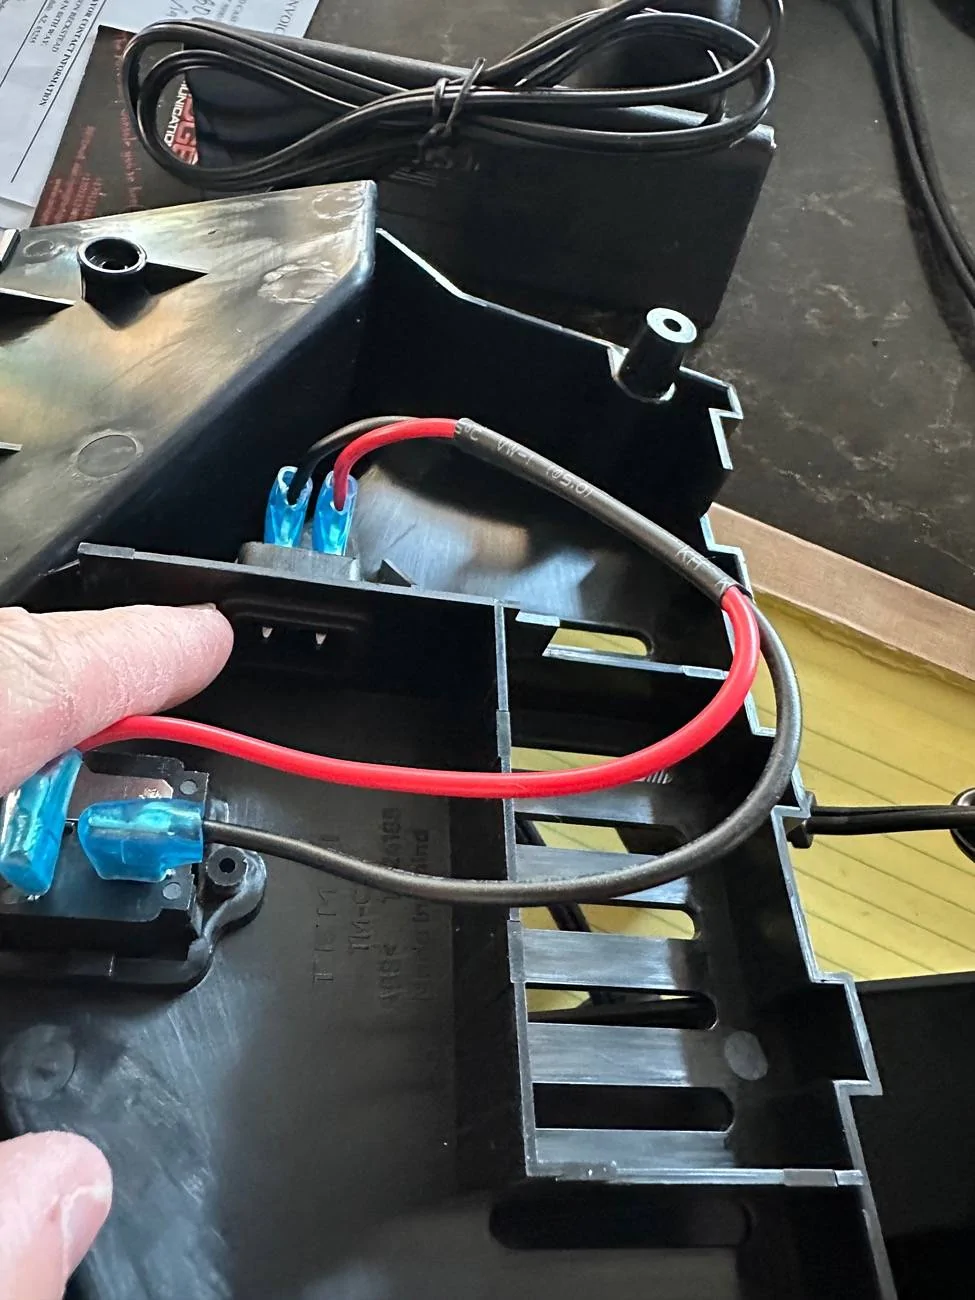
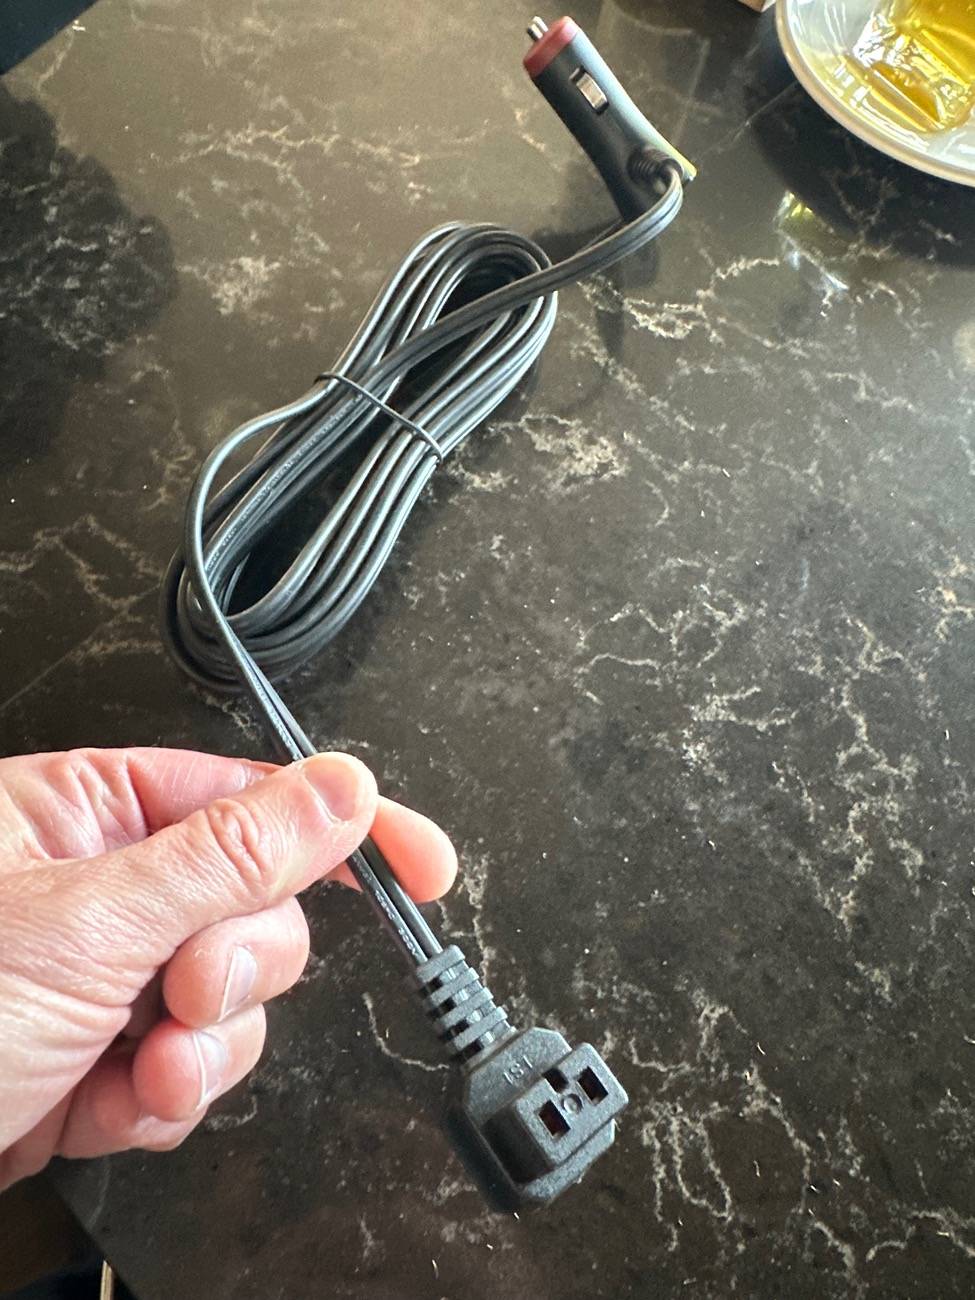
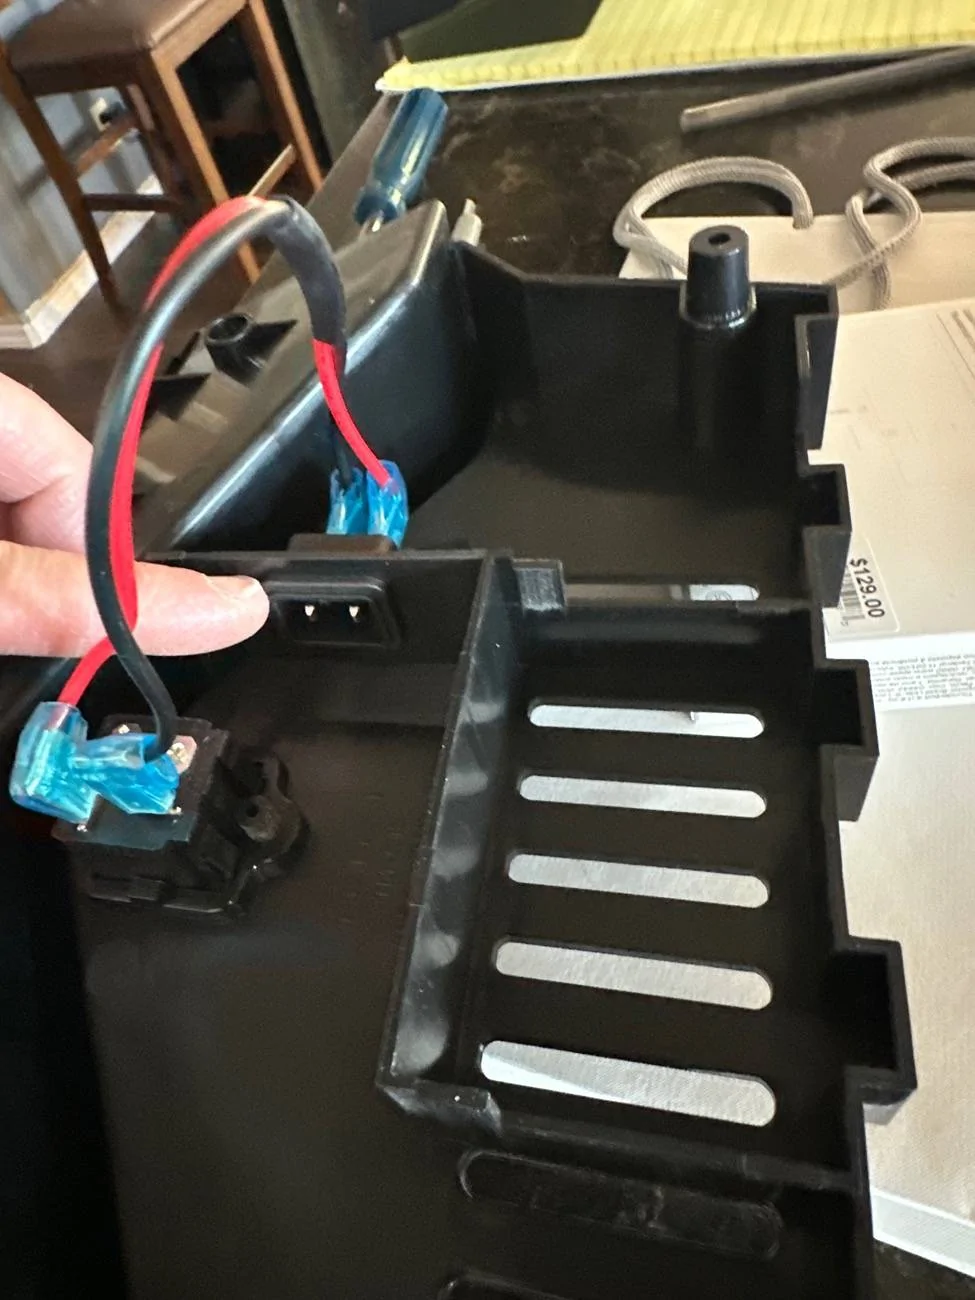
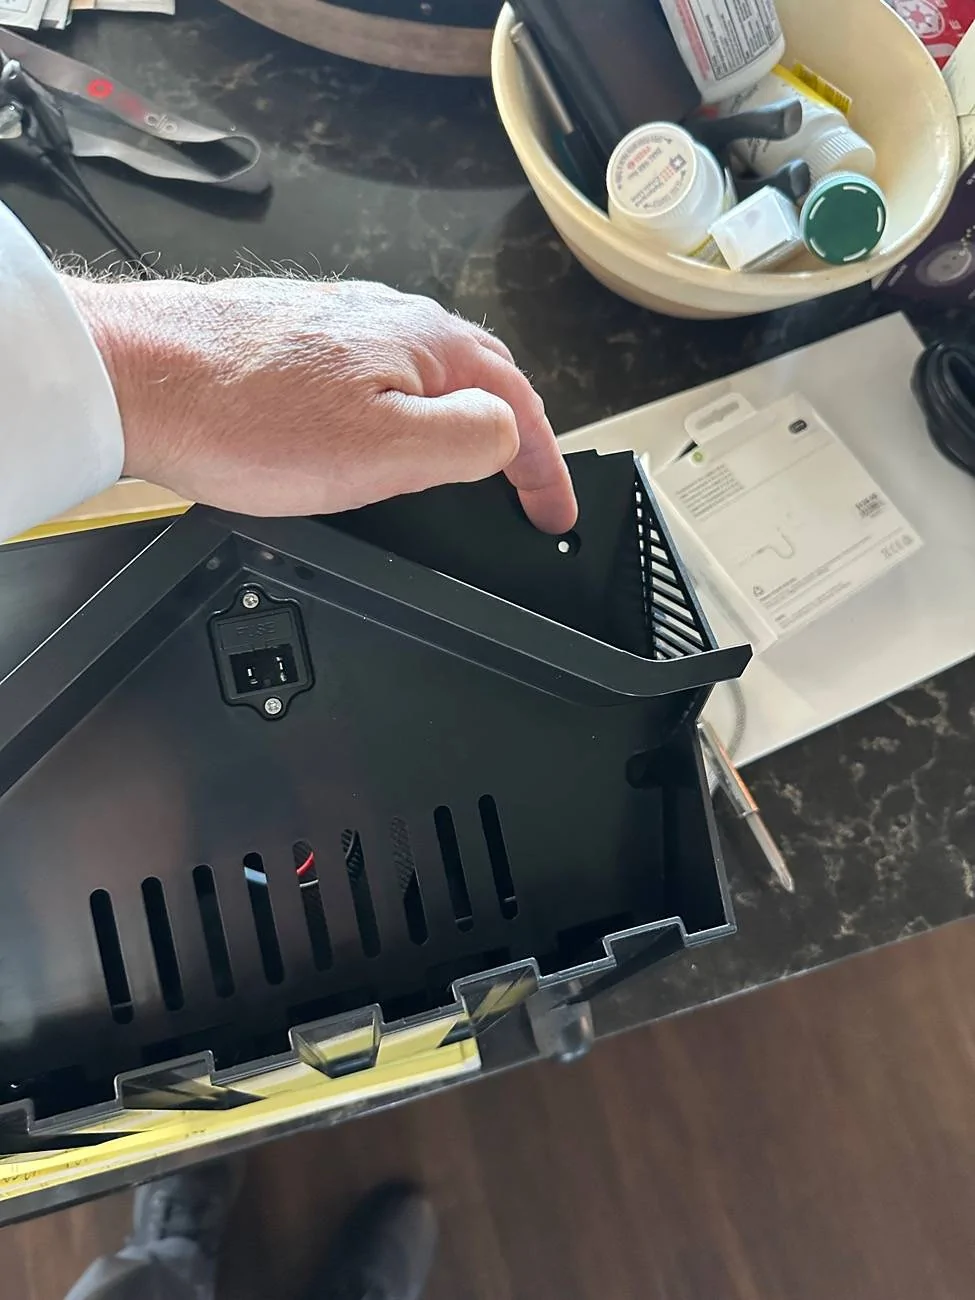
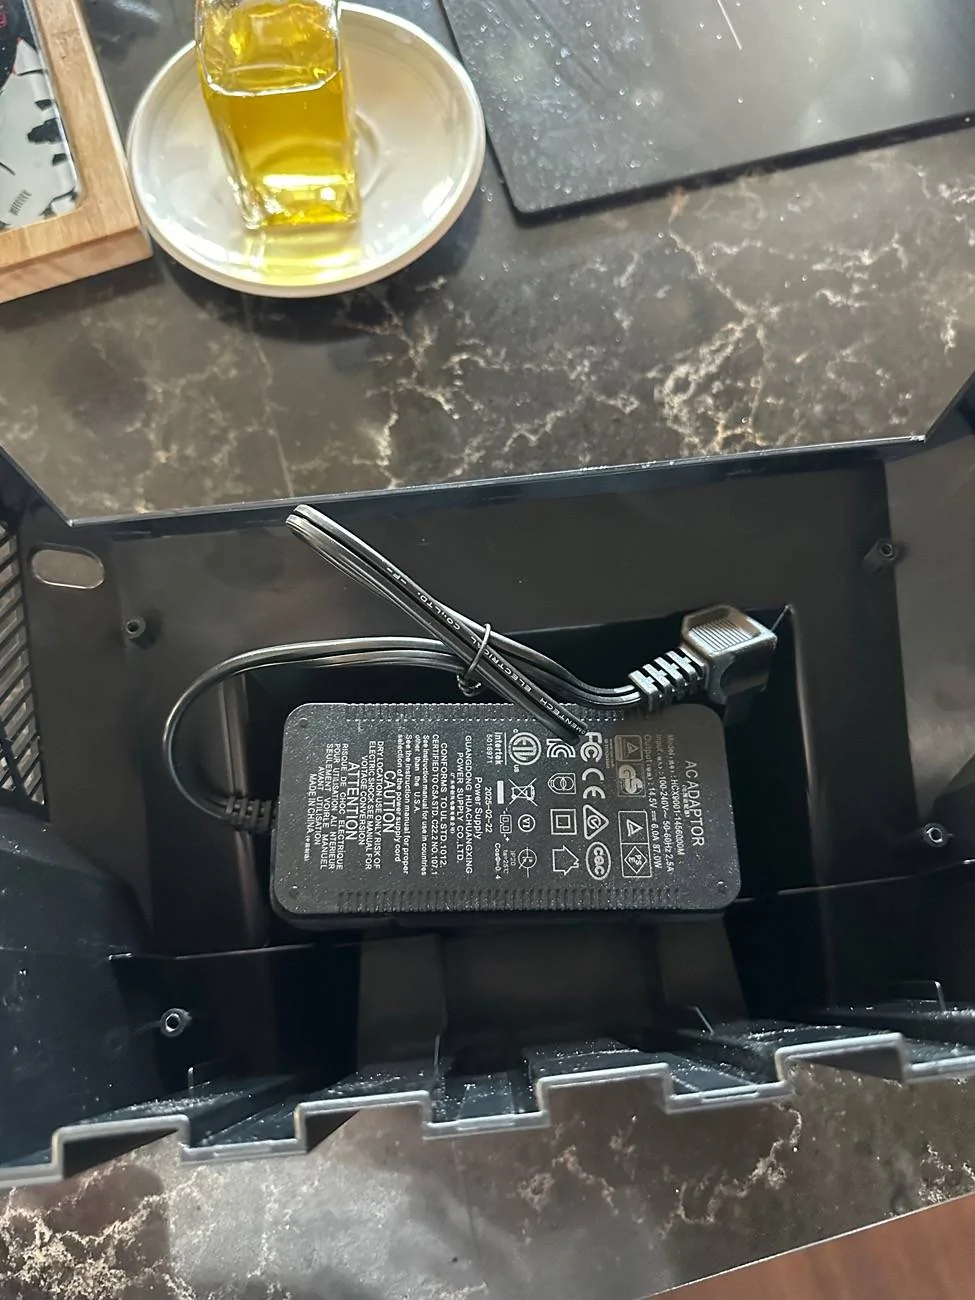
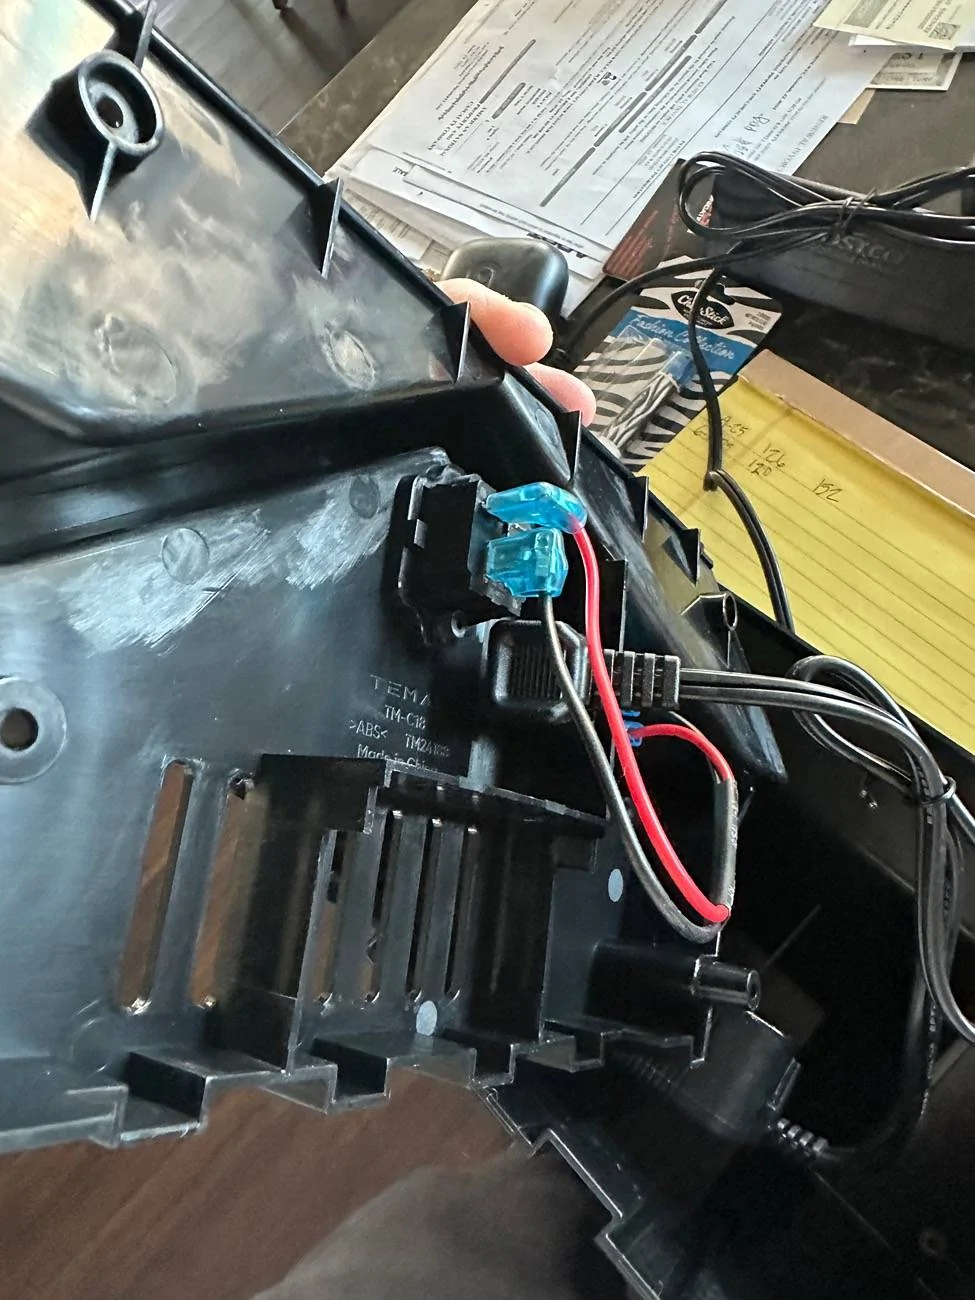
I then went and took the Cybergearco ac-dc converter apart. Low and behold! It’s innards are just an AC-DC converter brick, and the output of that brick is just a common DC fridge plug.

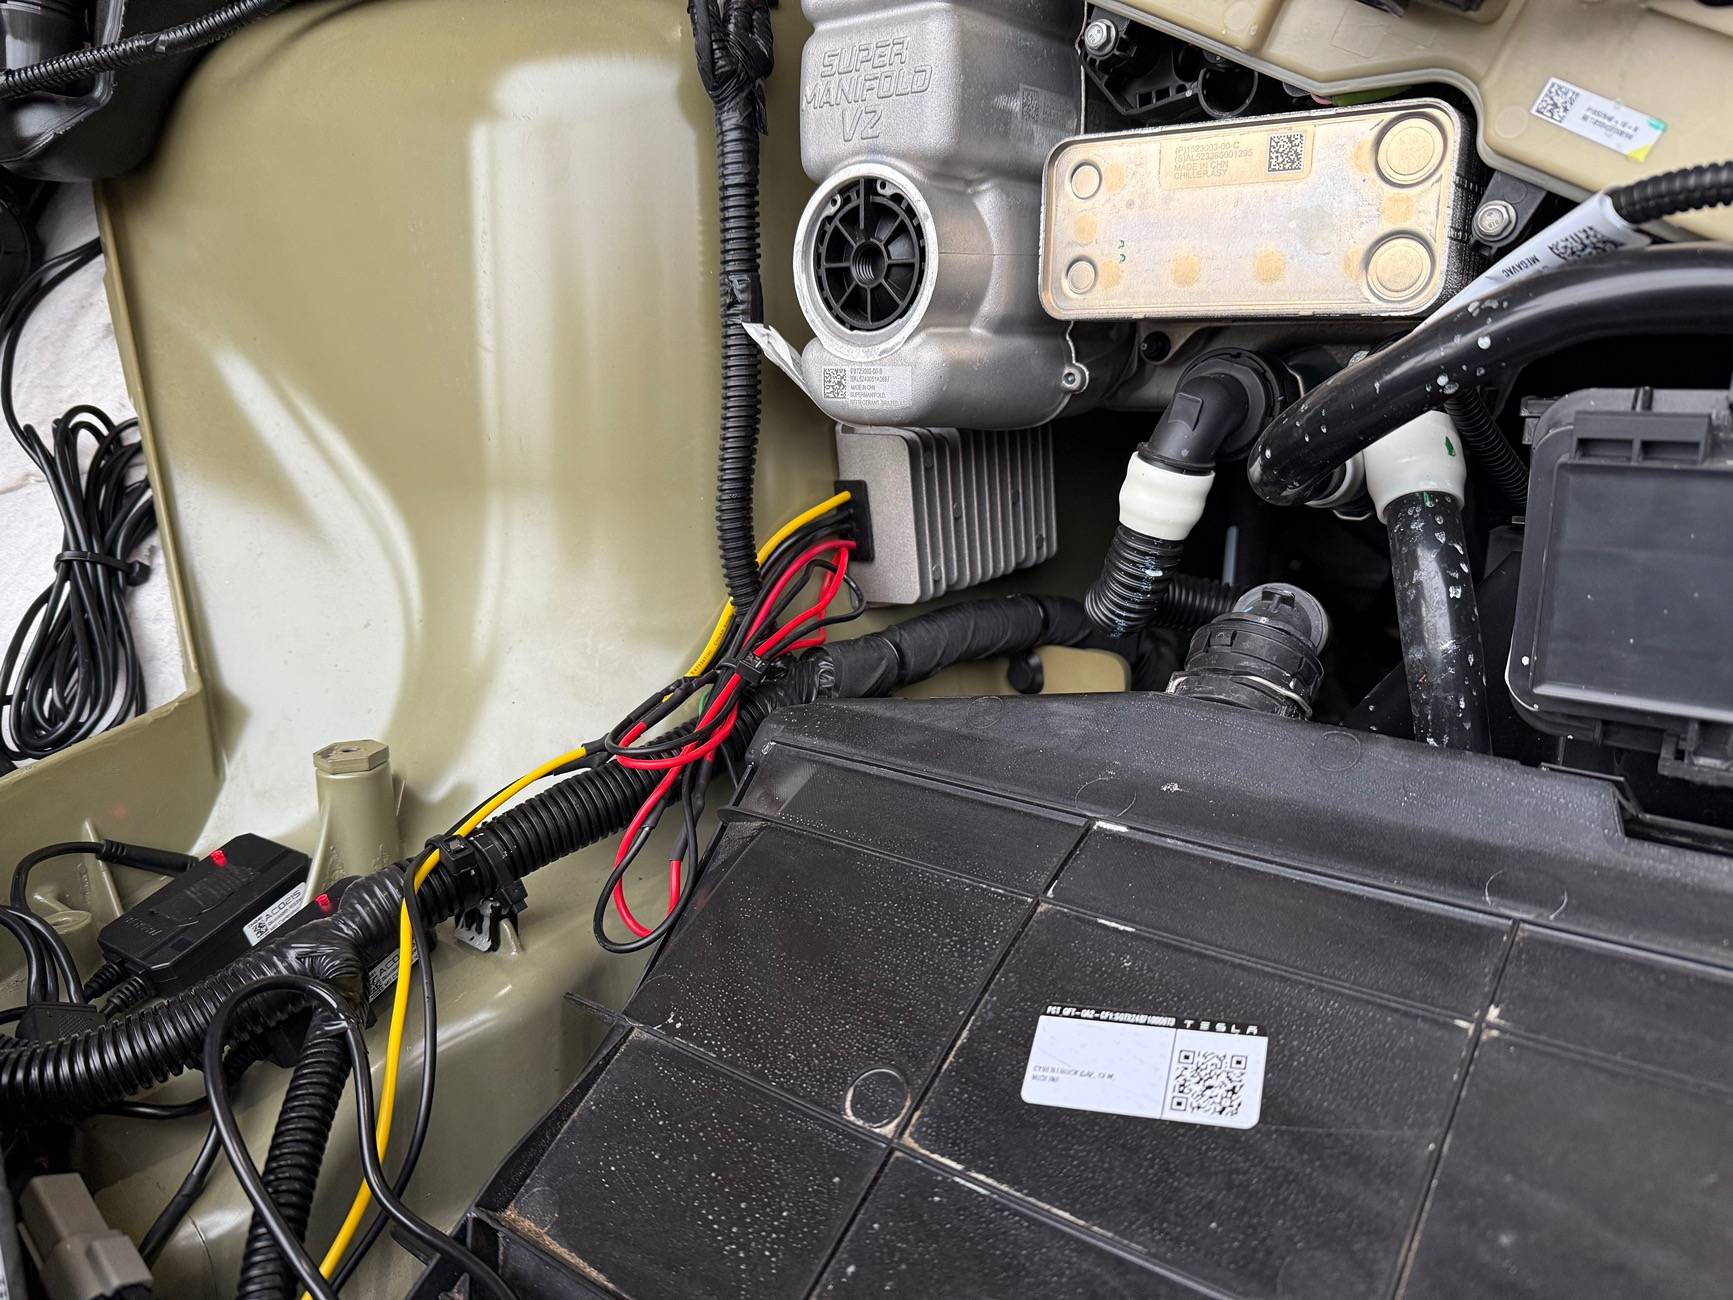
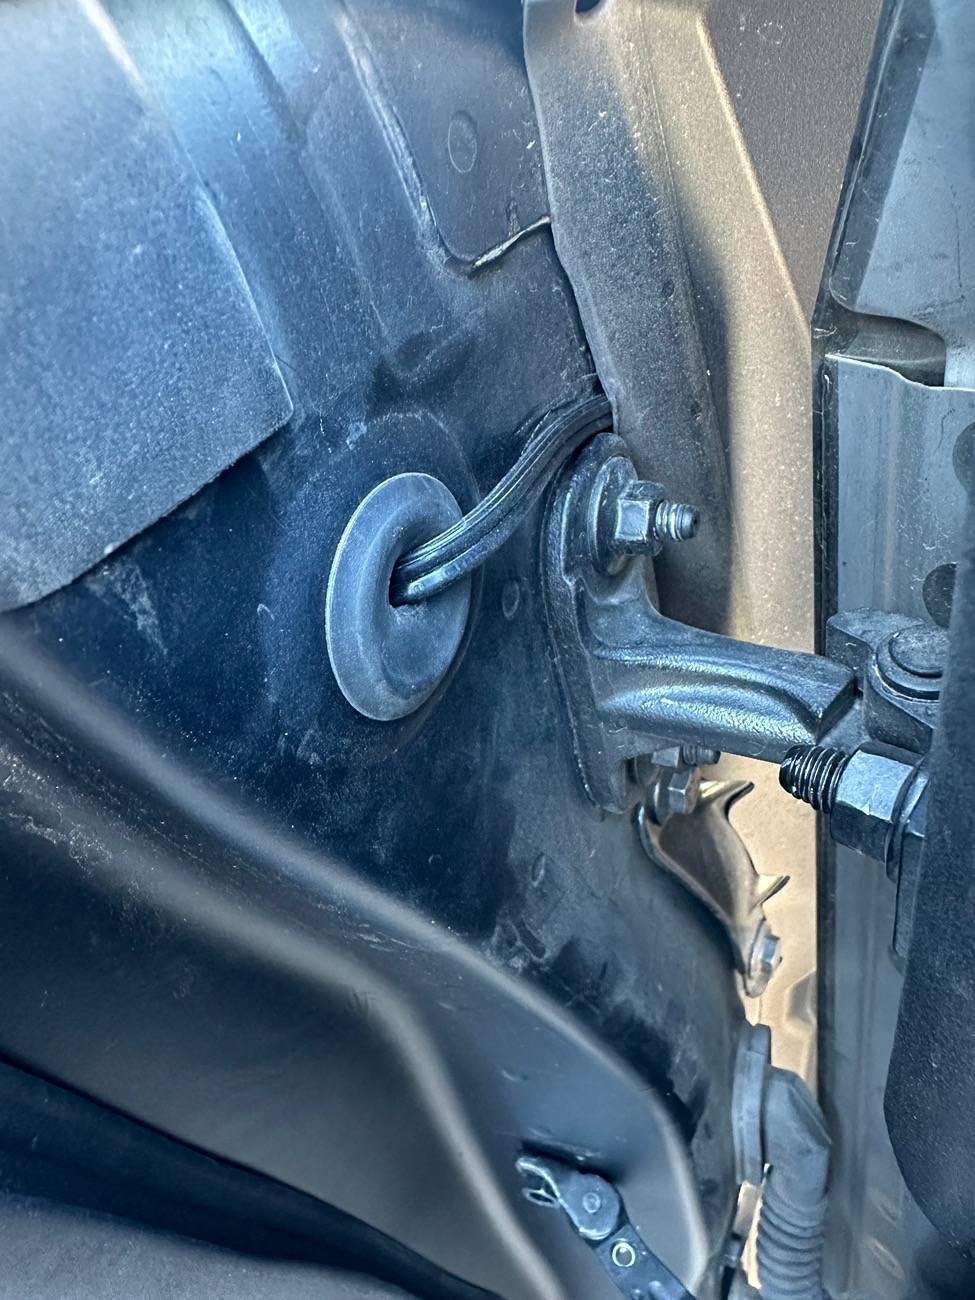
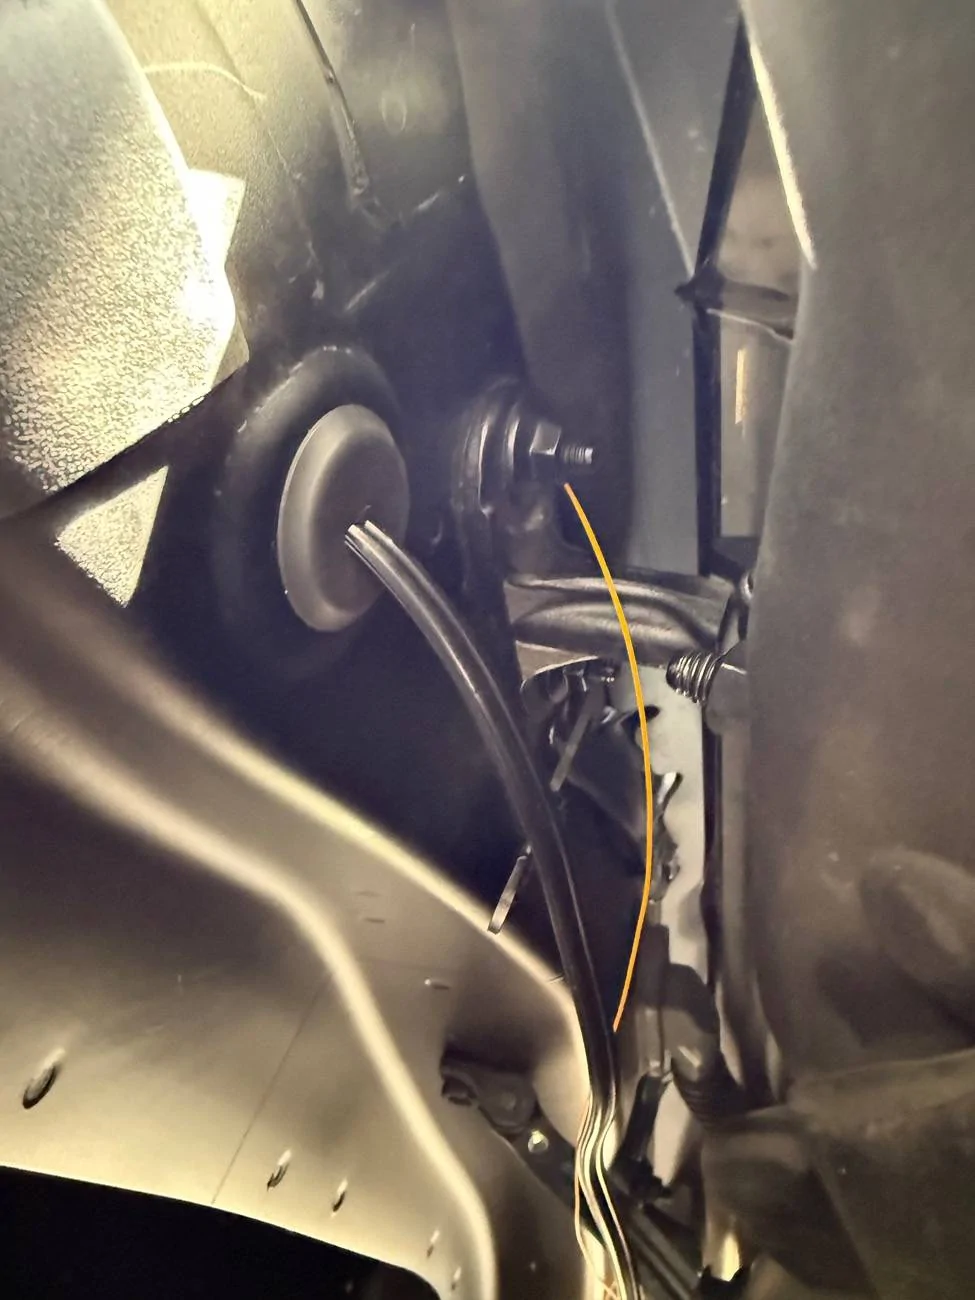
Below is a group of photos showing my straight DC install.

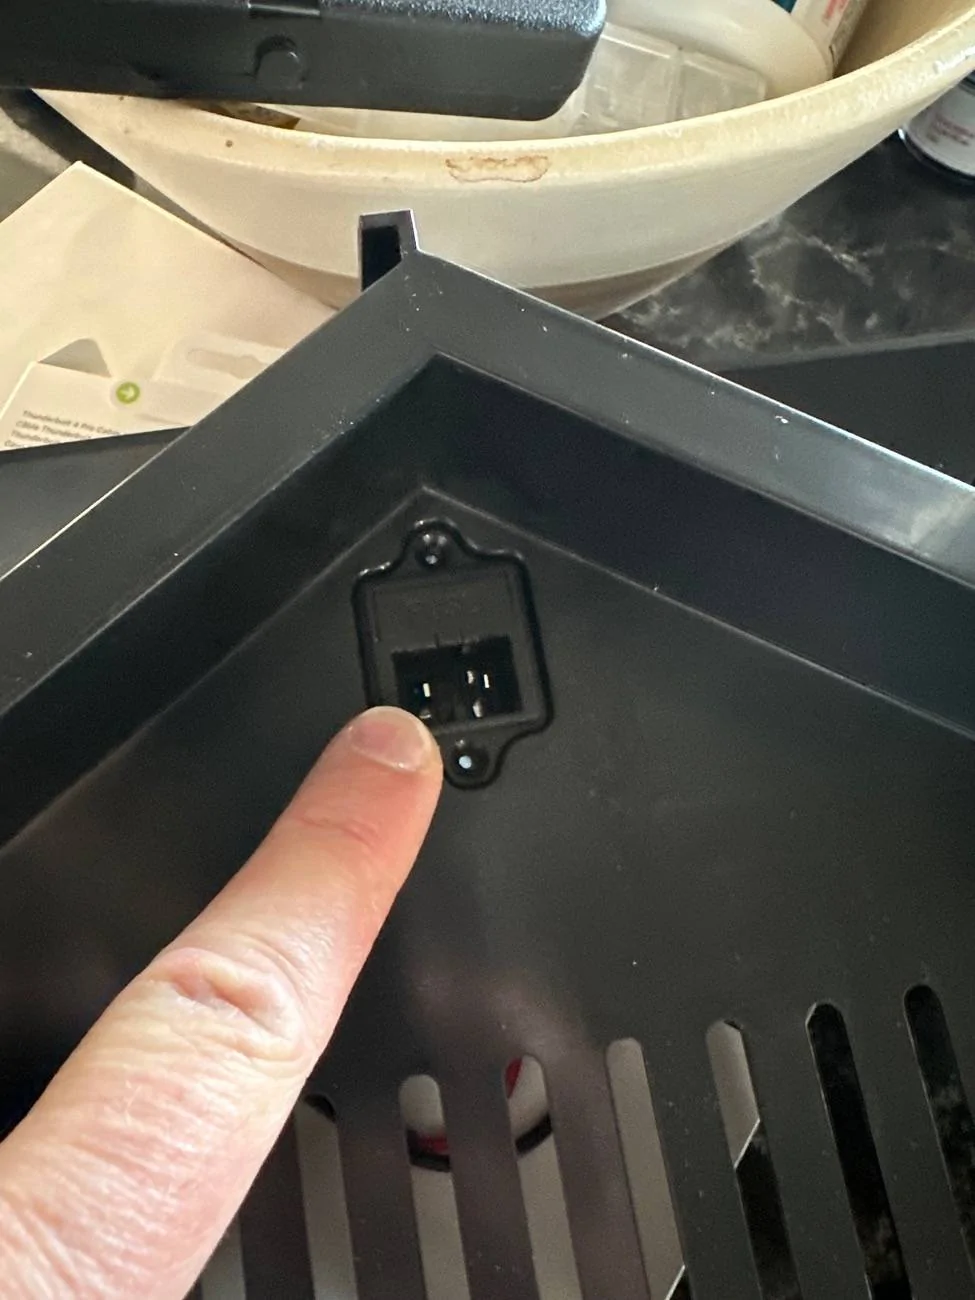
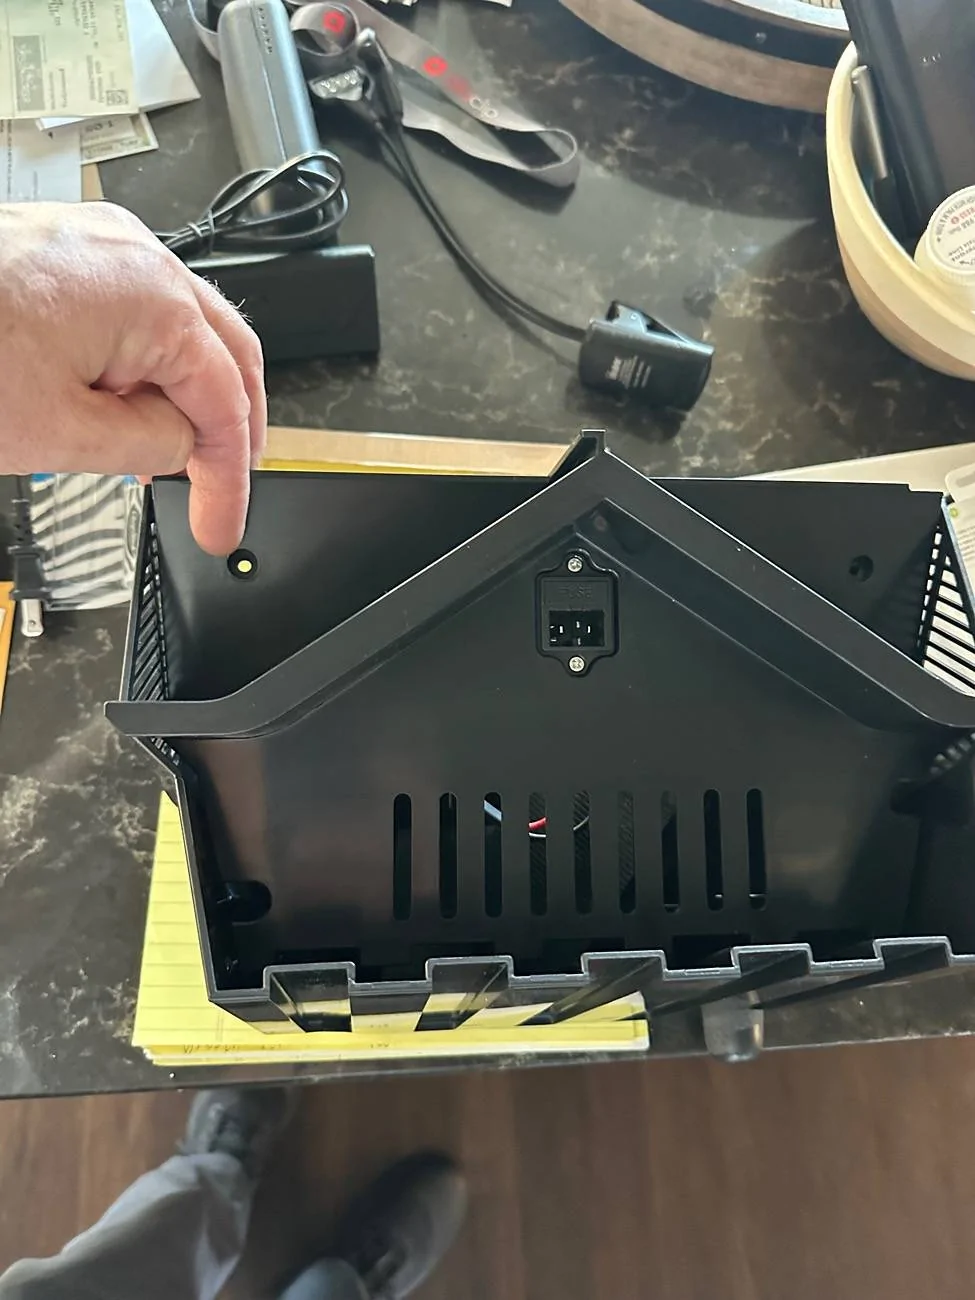
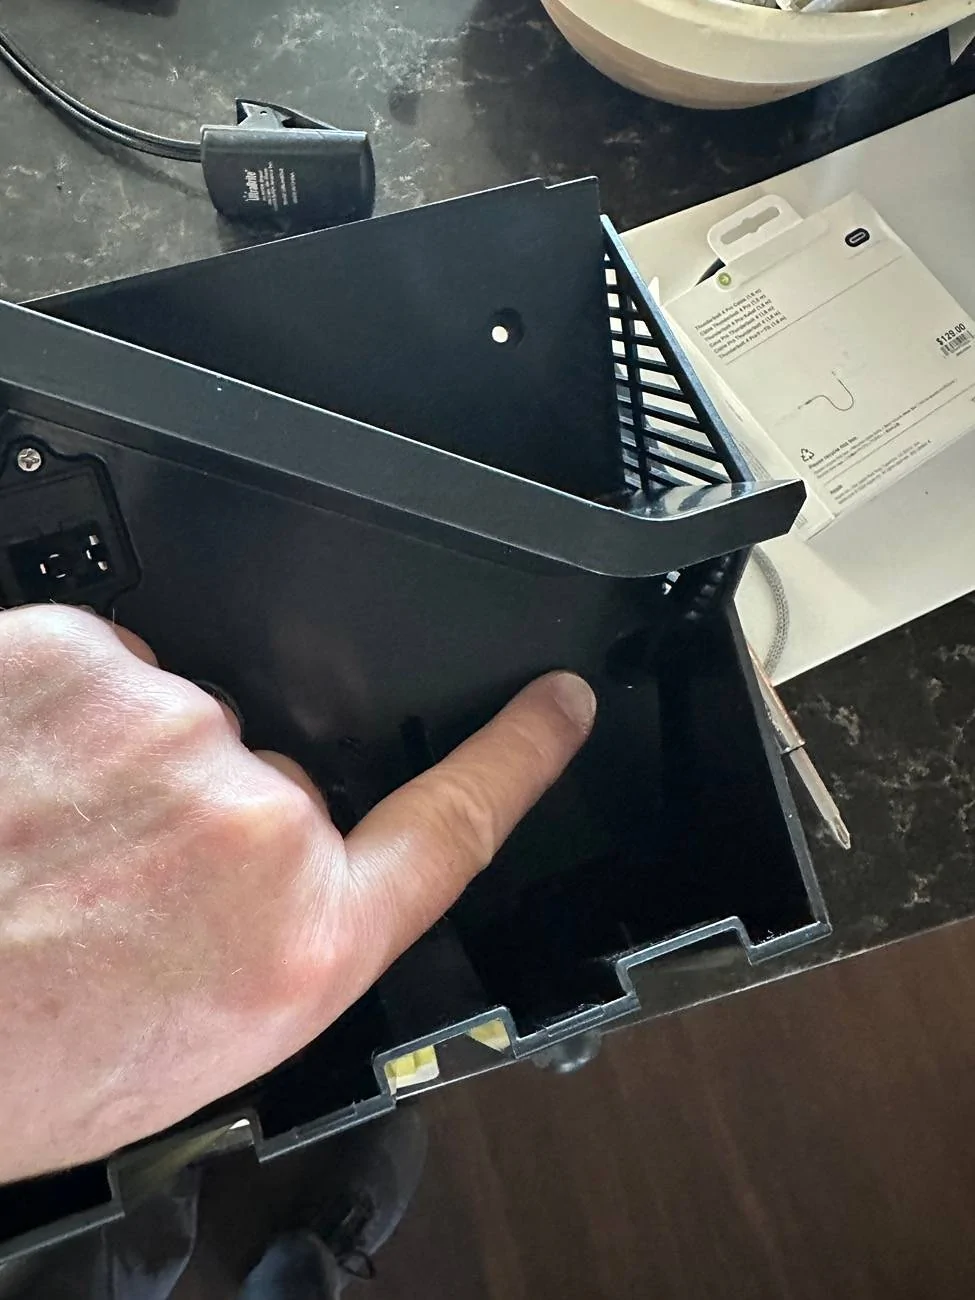
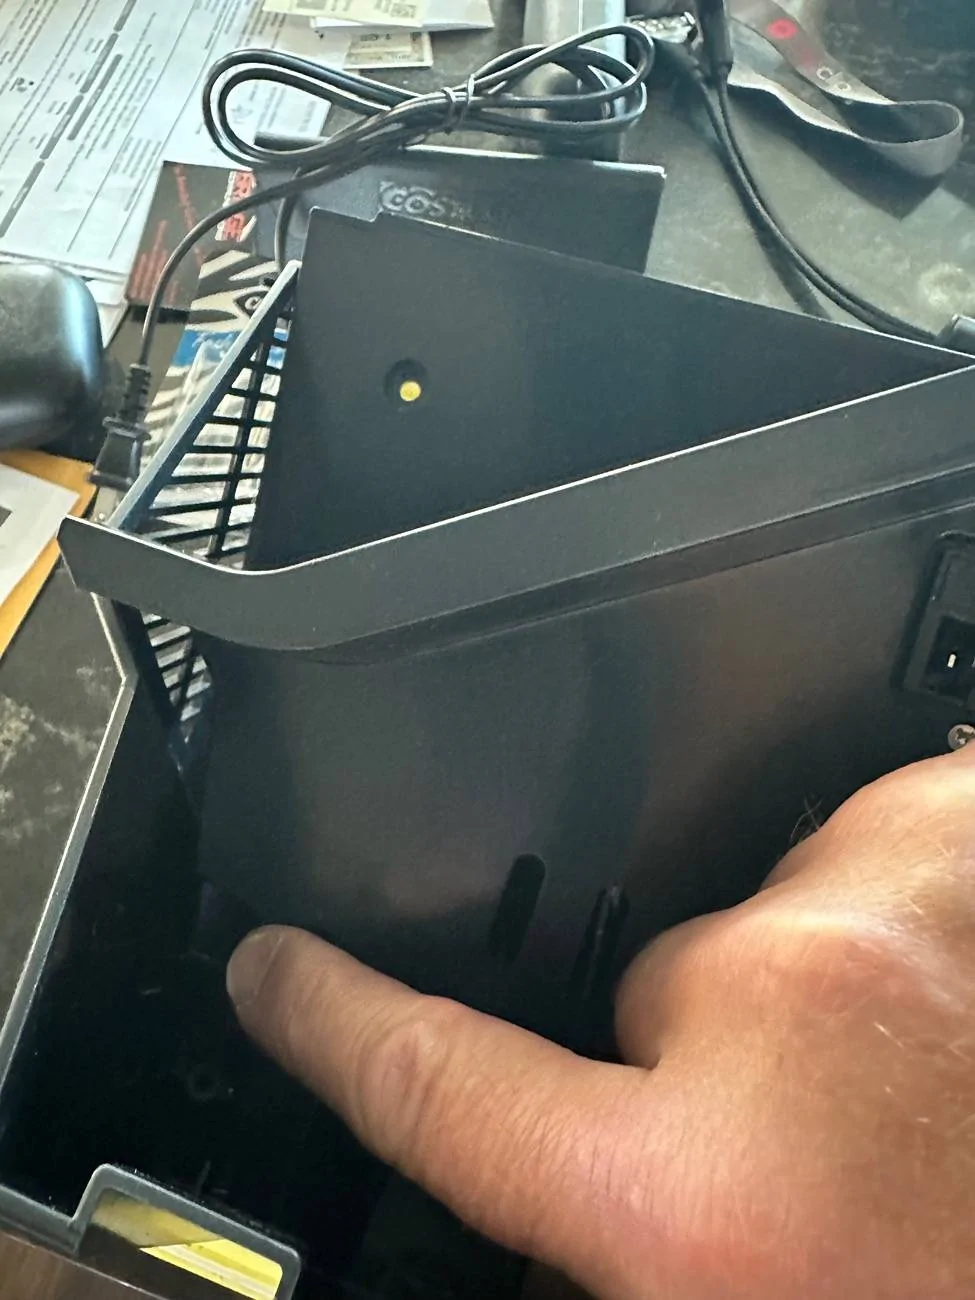
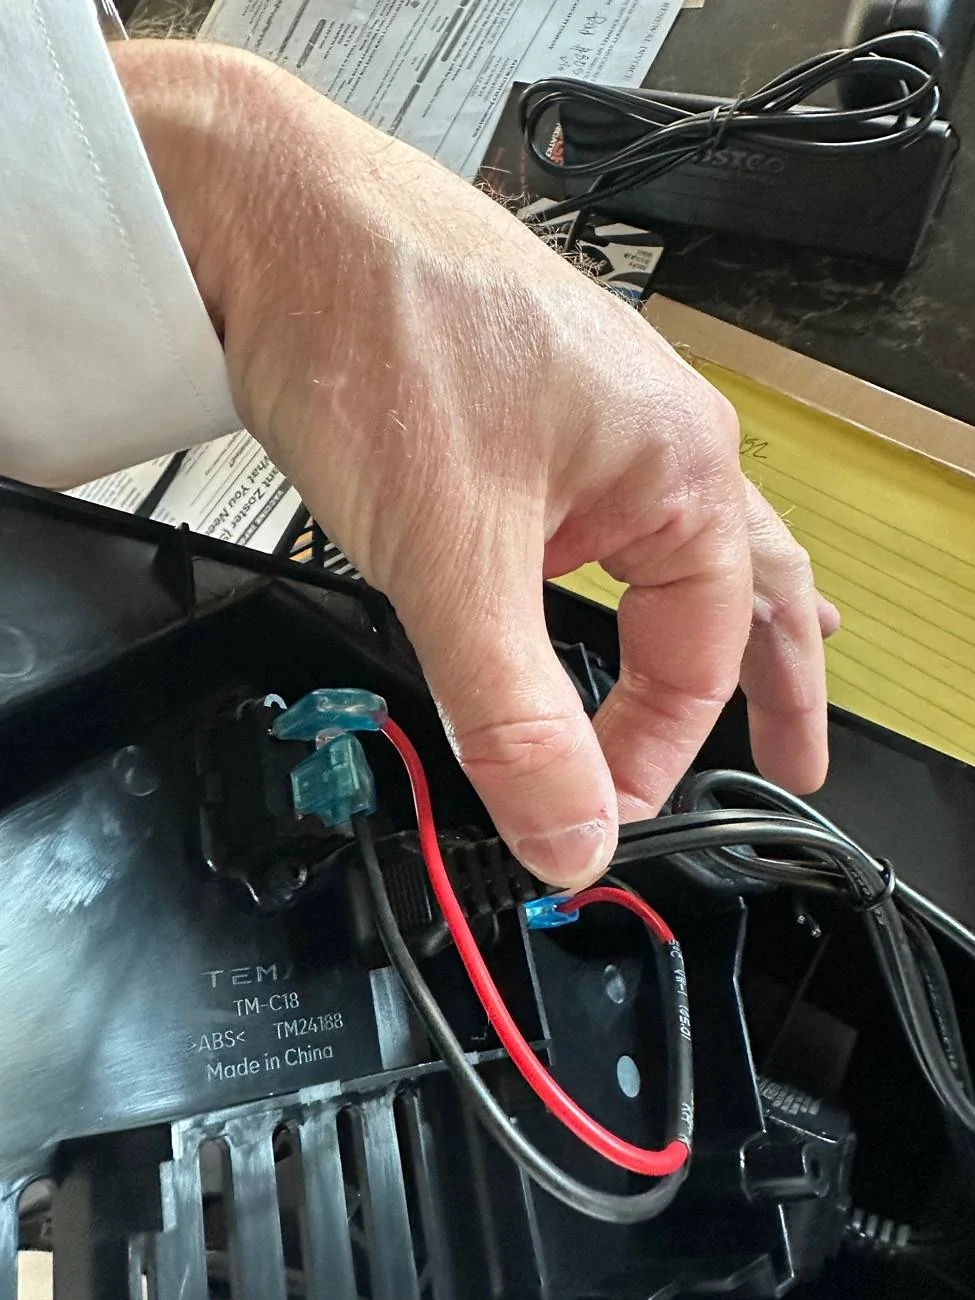
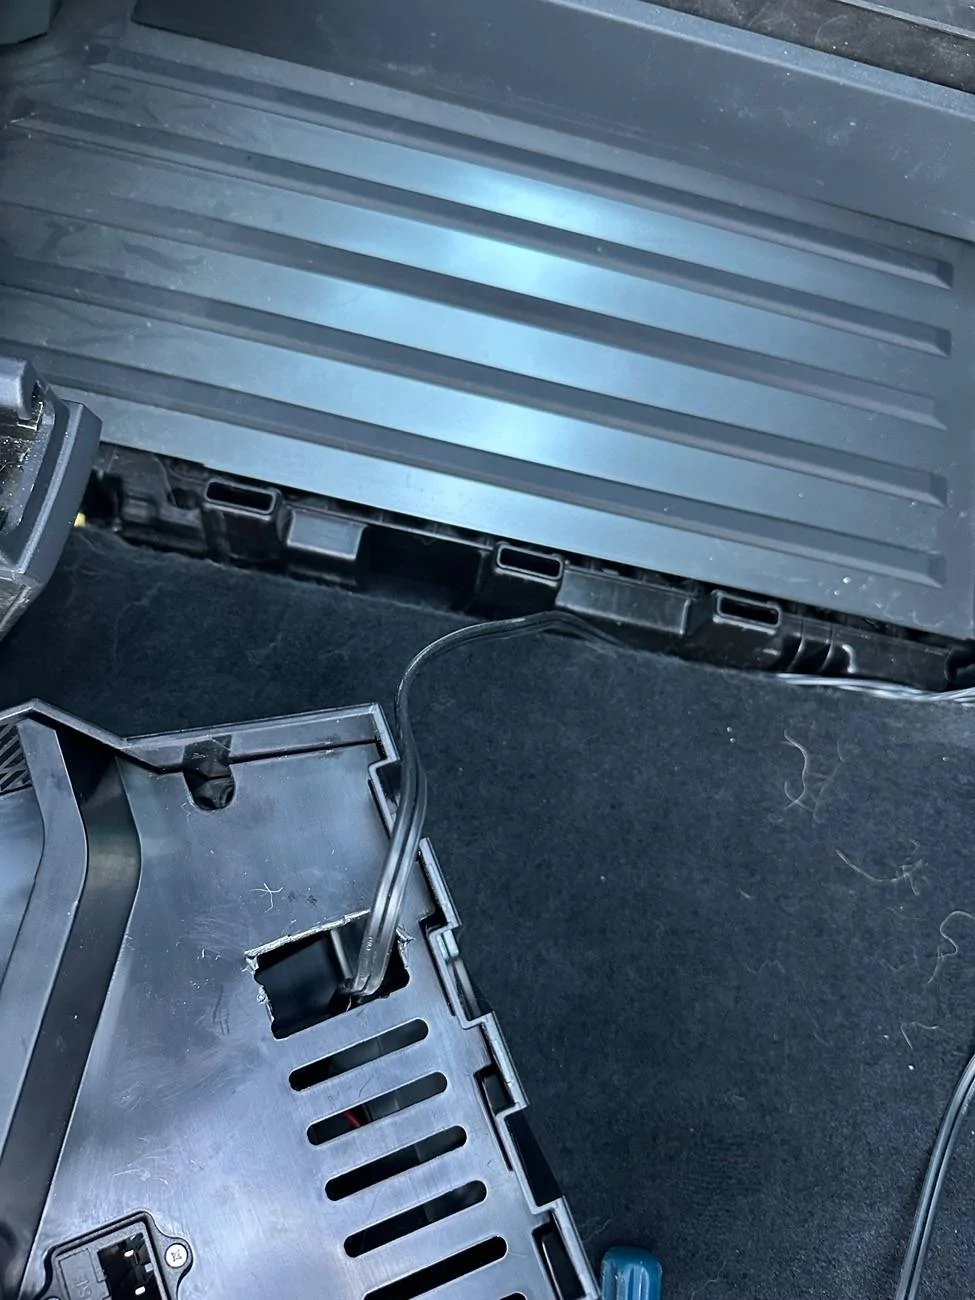
You unscrew 4 screws in the ac-dc converter. Unplug (I unplugged and removed) the internal AC-DC converter brick. Run your DC cable from the frunk to the center console. I had to etch a few of the vent slats out to allow for my DC cable head plug to fit in the plastic housing. Plug your DC fridge cable into the DC plug internal to the Cybergearco power supply housing.

This allows for the fridge to be run either from the 48 volt accessory feed in the frunk using a Buck converter or from a 12 volt output from a solar generator in the frunk.

It also avoids the conversion loss of DC to AC back to DC.

Happy Cybertrucking!

Tesla Cybertruck Cybergearco Cooler / Fridge / Refrigerator -- DC Install IMG_3013


Tesla Cybertruck Cybergearco Cooler / Fridge / Refrigerator -- DC Install IMG_3004


Tesla Cybertruck Cybergearco Cooler / Fridge / Refrigerator -- DC Install IMG_3006


Tesla Cybertruck Cybergearco Cooler / Fridge / Refrigerator -- DC Install IMG_3005


Tesla Cybertruck Cybergearco Cooler / Fridge / Refrigerator -- DC Install IMG_3007


Tesla Cybertruck Cybergearco Cooler / Fridge / Refrigerator -- DC Install IMG_3008


Tesla Cybertruck Cybergearco Cooler / Fridge / Refrigerator -- DC Install IMG_3009


Tesla Cybertruck Cybergearco Cooler / Fridge / Refrigerator -- DC Install IMG_3010


Tesla Cybertruck Cybergearco Cooler / Fridge / Refrigerator -- DC Install IMG_3013


Tesla Cybertruck Cybergearco Cooler / Fridge / Refrigerator -- DC Install IMG_3014


Tesla Cybertruck Cybergearco Cooler / Fridge / Refrigerator -- DC Install IMG_3011


Tesla Cybertruck Cybergearco Cooler / Fridge / Refrigerator -- DC Install IMG_3012


Tesla Cybertruck Cybergearco Cooler / Fridge / Refrigerator -- DC Install IMG_3015
Sponsored


hemiarch

Well-known member
First Name
Ace
Joined
Jan 22, 2025
Threads
116
Messages
8,378
Reaction score
9,630
Location
Arizona
Vehicles
2024 foundation AWD, 2024 model x
Occupation
Trauma Surgeon
Country flag
You’re the man J. Mine next!
I’d like to make back the energy cost of running the tiny inverter on the Ecoflow river 2 pro.
most of my fridges use up about 30w on dc. This one burns about 60w on ac power. What is the bluetti reading for dc consumption?
 

Rook-E

Well-known member
First Name
Brian
Joined
Dec 22, 2023
Threads
8
Messages
135
Reaction score
267
Location
Bonney Lake, WA
Vehicles
Tesla Model Y LR, Cybertruck AWD
Country flag
Thanks for sharing, this is great. I have a step down converter hooked up to the frunk power feed. It’s used for DRL and underglow lighting. Do you think I could tap into that for the fridge or would I need another converter?
Tesla Cybertruck Cybergearco Cooler / Fridge / Refrigerator -- DC Install IMG_0030
 
OP
OP
CT_AZ_4x4

CT_AZ_4x4

Well-known member
First Name
Jay
Joined
May 22, 2024
Threads
46
Messages
840
Reaction score
1,406
Location
Scottsdale, AZ
Vehicles
AWD CT
Occupation
Self employed
Country flag
Thanks for sharing, this is great. I have a step down converter hooked up to the frunk power feed. It’s used for DRL and underglow lighting. Do you think I could tap into that for the fridge or would I need another converter?
IMG_0030.jpeg
A Buck down converter will probably perfectly power your fridge. In max cool mode the fridge pulls about 50 watts and in econo mode it pulls only about 35-36 watts. Your Buck converter is probably rated for much greater wattage. You should check your spec sheet for your Buck converter to see what its max wattage is, and then add up the fridge’s wattage with that of your DLR & underglow lighting units. So long as your Buck converter’s max isn’t maxed out, you should be good-to-go!

You might even be fine if your wattage is not exceeded by a great deal. It could mean dimmer underglow but I bet you’d be fine with your existing Buck converter running it all.

As you already know, just make sure that your positive and negative leads are properly connected to the positive and negative of the fridge’s input. These are easy to identify as the red is positive and the black is negative.


OP
OP
CT_AZ_4x4

CT_AZ_4x4

Well-known member
First Name
Jay
Joined
May 22, 2024
Threads
46
Messages
840
Reaction score
1,406
Location
Scottsdale, AZ
Vehicles
AWD CT
Occupation
Self employed
Country flag
@CT_AZ_4x4 what route do I take to run the wire from the cab to frunk?
(1) Open front passenger door. Start near a top edge, and begin to pull the door gasket off the front passenger door opening. Probably leave it still attached somewhat at the side opposing the frunk (to make it easier to re-install once done).

(2) There is a square piece of molding near where the dash meets the door frame. It hinges towards the driver’s side if you pull it rearward, away from the frunk. It is “clipped” in place. Unclip it and hinge it towards the driver’s side.

(3) The trim around the door near the passenger footwell and including the silver footplate with “Cybertruck” written on it is just clipped in place. Unclip it entirely because it bends and flops and will piss you off. Put it aside and out of the way for re-assembly.

(4) My truck has a push-pull pin in the carpet covered by the last piece of trim removed. If you have one, use a trim tool to pull out the pin.

(5) Use a trim tool to pop off the left-side plastic hockey-stick shaped trim on the passenger’s side of the floor console.

(6) Beginning near the passenger door, fold the carpet down and away from the glove compartment area and from underneath the dash until you have a clear path to run your wiring.

(7) FROM THE PASSENGER SIDE OPEN DOOR, take an electrian’s fishtape-type tool or a wire hanger, and work that forward from close to where the door hinge is located and into your frunk. Use this fishtape (or similar) to pull your wire from the frunk to CLOSE TO WHERE YOUR DOOR HINGE IS PHYSICALLY LOCATED WITH THE DOOR OPEN. YOU ARE NOT YET AT THE POINT OF WORKING THIS NEW WIRE INTO THE CABIN. To keep the slice in the grommet small, I had cut the plug head off my DC cable and I soldered it back together and used heat shrink to protect it ONCE the new wire was routed into the cabin area.

(8) There is a rubber grommet about the size of a silver dollar in this location, sealing the cabin gunwhale from the door-hinge area. Slice a hole big enough to worm your new wire into the gunwhale. Fish it down and in, to where you need it to go.

The attached photo shows you were I ran my 12 volt wire into the cabin from the frunk to feed my fridge.

BTW, in Econ-mode my fridge is pulling sub-30 watts per hour, even in the Phoenix, AZ heat (with the truck parked in my non-air conditioned garage). My Bluetti AC50 has about 475 watt hours at full charge and after running the fridge for about 9 hours today from 7:30 AM it is still at 50% charge.

Good luck! Enjoy your awesome truck!

Tesla Cybertruck Cybergearco Cooler / Fridge / Refrigerator -- DC Install IMG_3042


I’ve got a little more length I’m going to pull into the frunk, and then I’m going to reseal the grommet with some clear RTV.
 
Last edited:

tmeyer3

Well-known member
First Name
Trevor
Joined
Jun 27, 2021
Threads
31
Messages
2,036
Reaction score
3,615
Location
CA
Website
www.meyerwine.com
Vehicles
Model 3, '73 GMC truck, Wrangler, Tractors
Occupation
Computer Scientist, Vintner
Country flag
(1) Open front passenger door. Start near a top edge, and begin to pull the door gasket off the front passenger door opening. Probably leave it still attached somewhat at the side opposing the frunk (to make it easier to re-install once done).

(2) There is a square piece of molding near where the dash meets the door frame. It hinges towards the driver’s side if you pull it rearward, away from the frunk. It is “clipped” in place. Unclip it and hinge it towards the driver’s side.

(3) The trim around the door near the passenger footwell and including the silver footplate with “Cybertruck” written on it is just clipped in place. Unclip it entirely because it bends and flops and will piss you off. Put it aside and out of the way for re-assembly.

(4) My truck has a push-pull pin in the carpet covered by the last piece of trim removed. If you have one, use a trim tool to pull out the pin.

(5) Use a trim tool to pop off the left-side plastic hockey-stick shaped trim on the passenger’s side of the floor console.

(6) Beginning near the passenger door, fold the carpet down and away from the glove compartment area and from underneath the dash until you have a clear path to run your wiring.

(7) FROM THE PASSENGER SIDE OPEN DOOR, take an electrian’s fishtape-type tool or a wire hanger, and work that forward from close to where the door hinge is located and into your frunk. Use this fishtape (or similar) to pull your wire from the frunk to CLOSE TO WHERE YOUR DOOR HINGE IS PHYSICALLY LOCATED WITH THE DOOR OPEN. YOU ARE NOT YET AT THE POINT OF WORKING THIS NEW WIRE INTO THE CABIN. To keep the slice in the grommet small, I had cut the plug head off my DC cable and I soldered it back together and used heat shrink to protect it ONCE the new wire was routed into the cabin area.

(8) There is a rubber grommet about the size of a silver dollar in this location, sealing the cabin gunwhale from the door-hinge area. Slice a hole big enough to worm your new wire into the gunwhale. Fish it down and in, to where you need it to go.

The attached photo shows you were I ran my 12 volt wire into the cabin from the frunk to feed my fridge.

BTW, in Econ-mode my fridge is pulling sub-30 watts per hour, even in the Phoenix, AZ heat (with the truck parked in my non-air conditioned garage). My Bluetti AC50 has about 475 watt hours at full charge and after running the fridge for about 9 hours today from 7:30 AM it is still at 50% charge.

Good luck! Enjoy your awesome truck!

IMG_3042.jpeg


I’ve got a little more length I’m going to pull into the frunk, and then I’m going to reseal the grommet with some clear RTV.
Best post I've seen in a while. This is gold info for modders!! Need to reroute a few things now that I'm enlightened.....


AlphaG

Well-known member
First Name
Dipan
Joined
Mar 2, 2023
Threads
3
Messages
98
Reaction score
153
Location
South Texas
Vehicles
S63, Elise, Besst
Country flag
I did the 12V mod but decided I wanted the battery in the main cabin for now. Some interesting observations also.

I went with a Pecron E500LFP but a smaller battery will probably work just fine also. This was the largest I could find that would still sit comfortably under the rear seats.

After modifying the power supply section of the refrigerator as described here in this thread (removing the AC/DC converter and wiring a 12V DC car cigarette lighter plug in its place), I ran the cable to the battery passing it under the carpet to keep it stealthy. I also ran a right angle USB 120W capable Anker USBC-PD cable to this cool adapter that converts USBC-PD power to a barrel plug that plugs into the solar input jack of the battery:, also neatly under the carpet. This ends up feeding 20V DC to the battery (Pecron rates this DC input for up to 100W and 12-28V DC from solar). Interestingly, it initially pulled around 80W, which is more than what the USBC ports are rated for. Not sure why that is..

All three cybertruck USBC ports are rated for power delivery (PD) up to 65W according to the manual. Later this week I will probe the ports to see what PD spec they are exactly.

Anyway. Not sure when the wattage dropped but probably when the battery reached near full capacity. Now it's basically in a steady stat with consumption, which is intermittent because the compressor cycles, but up to around low 50W range, typically 52W according to the Pecron. Around 60W is pulled from the USBC port keeping the battery topped off. This is on the MAX setting. The ECO setting I didn't use much but wattage was in the 30's.

I like this setup immensely as the fridge always runs, even when charging at home with a level 2 AC charger. Before, when I was charging the battery with the AC plug in the cybertruck, it would sometimes go dead, depending on if the car was plugged in to charge at home or not (eg If plugged in at home over the weekend). The battery is also always fully charged. Wondering if I even need that size of a battery.

An even simpler setup I was considering was to just put a small USB power bank in the power supply spot behind the fridge and just run a USBC cable to it via the appropriate adapter to keep it topped off. Maybe one of y'all will try it!

Hope this helps someone. I can post pics if that helps also.
 
OP
OP
CT_AZ_4x4

CT_AZ_4x4

Well-known member
First Name
Jay
Joined
May 22, 2024
Threads
46
Messages
840
Reaction score
1,406
Location
Scottsdale, AZ
Vehicles
AWD CT
Occupation
Self employed
Country flag
I did the 12V mod but decided I wanted the battery in the main cabin for now. Some interesting observations also.

I went with a Pecron E500LFP but a smaller battery will probably work just fine also. This was the largest I could find that would still sit comfortably under the rear seats.

After modifying the power supply section of the refrigerator as described here in this thread (removing the AC/DC converter and wiring a 12V DC car cigarette lighter plug in its place), I ran the cable to the battery passing it under the carpet to keep it stealthy. I also ran a right angle USB 120W capable Anker USBC-PD cable to this cool adapter that converts USBC-PD power to a barrel plug that plugs into the solar input jack of the battery:, also neatly under the carpet. This ends up feeding 20V DC to the battery (Pecron rates this DC input for up to 100W and 12-28V DC from solar). Interestingly, it initially pulled around 80W, which is more than what the USBC ports are rated for. Not sure why that is..

All three cybertruck USBC ports are rated for power delivery (PD) up to 65W according to the manual. Later this week I will probe the ports to see what PD spec they are exactly.

Anyway. Not sure when the wattage dropped but probably when the battery reached near full capacity. Now it's basically in a steady stat with consumption, which is intermittent because the compressor cycles, but up to around low 50W range, typically 52W according to the Pecron. Around 60W is pulled from the USBC port keeping the battery topped off. This is on the MAX setting. The ECO setting I didn't use much but wattage was in the 30's.

I like this setup immensely as the fridge always runs, even when charging at home with a level 2 AC charger. Before, when I was charging the battery with the AC plug in the cybertruck, it would sometimes go dead, depending on if the car was plugged in to charge at home or not (eg If plugged in at home over the weekend). The battery is also always fully charged. Wondering if I even need that size of a battery.

An even simpler setup I was considering was to just put a small USB power bank in the power supply spot behind the fridge and just run a USBC cable to it via the appropriate adapter to keep it topped off. Maybe one of y'all will try it!

Hope this helps someone. I can post pics if that helps also.
Nice job!
 

hemiarch

Well-known member
First Name
Ace
Joined
Jan 22, 2025
Threads
116
Messages
8,378
Reaction score
9,630
Location
Arizona
Vehicles
2024 foundation AWD, 2024 model x
Occupation
Trauma Surgeon
Country flag
I did the 12V mod but decided I wanted the battery in the main cabin for now. Some interesting observations also.

I went with a Pecron E500LFP but a smaller battery will probably work just fine also. This was the largest I could find that would still sit comfortably under the rear seats.

After modifying the power supply section of the refrigerator as described here in this thread (removing the AC/DC converter and wiring a 12V DC car cigarette lighter plug in its place), I ran the cable to the battery passing it under the carpet to keep it stealthy. I also ran a right angle USB 120W capable Anker USBC-PD cable to this cool adapter that converts USBC-PD power to a barrel plug that plugs into the solar input jack of the battery:, also neatly under the carpet. This ends up feeding 20V DC to the battery (Pecron rates this DC input for up to 100W and 12-28V DC from solar). Interestingly, it initially pulled around 80W, which is more than what the USBC ports are rated for. Not sure why that is..

All three cybertruck USBC ports are rated for power delivery (PD) up to 65W according to the manual. Later this week I will probe the ports to see what PD spec they are exactly.

Anyway. Not sure when the wattage dropped but probably when the battery reached near full capacity. Now it's basically in a steady stat with consumption, which is intermittent because the compressor cycles, but up to around low 50W range, typically 52W according to the Pecron. Around 60W is pulled from the USBC port keeping the battery topped off. This is on the MAX setting. The ECO setting I didn't use much but wattage was in the 30's.

I like this setup immensely as the fridge always runs, even when charging at home with a level 2 AC charger. Before, when I was charging the battery with the AC plug in the cybertruck, it would sometimes go dead, depending on if the car was plugged in to charge at home or not (eg If plugged in at home over the weekend). The battery is also always fully charged. Wondering if I even need that size of a battery.

An even simpler setup I was considering was to just put a small USB power bank in the power supply spot behind the fridge and just run a USBC cable to it via the appropriate adapter to keep it topped off. Maybe one of y'all will try it!

Hope this helps someone. I can post pics if that helps also.
Second that. Very nice job.
Two requests. Can we get a working link for the cool adapter and also a pic of the little power station under the back seat?
 

AlphaG

Well-known member
First Name
Dipan
Joined
Mar 2, 2023
Threads
3
Messages
98
Reaction score
153
Location
South Texas
Vehicles
S63, Elise, Besst
Country flag

AlphaG

Well-known member
First Name
Dipan
Joined
Mar 2, 2023
Threads
3
Messages
98
Reaction score
153
Location
South Texas
Vehicles
S63, Elise, Besst
Country flag
The Pecron is out of stock but I just bought it about 3 weeks ago. Hopefully it comes back in stock. Most other batteries (solar generators) this size are too tall physically,but if just running the fridge I'm sure half the size would be enough.
Sponsored


Top