Sponsored

Leo Snow

Well-known member
First Name
Leo
Joined
Nov 3, 2024
Threads
26
Messages
128
Reaction score
235
Location
Kelowna
Vehicles
Cybertruck AWD, Model Y
Country flag
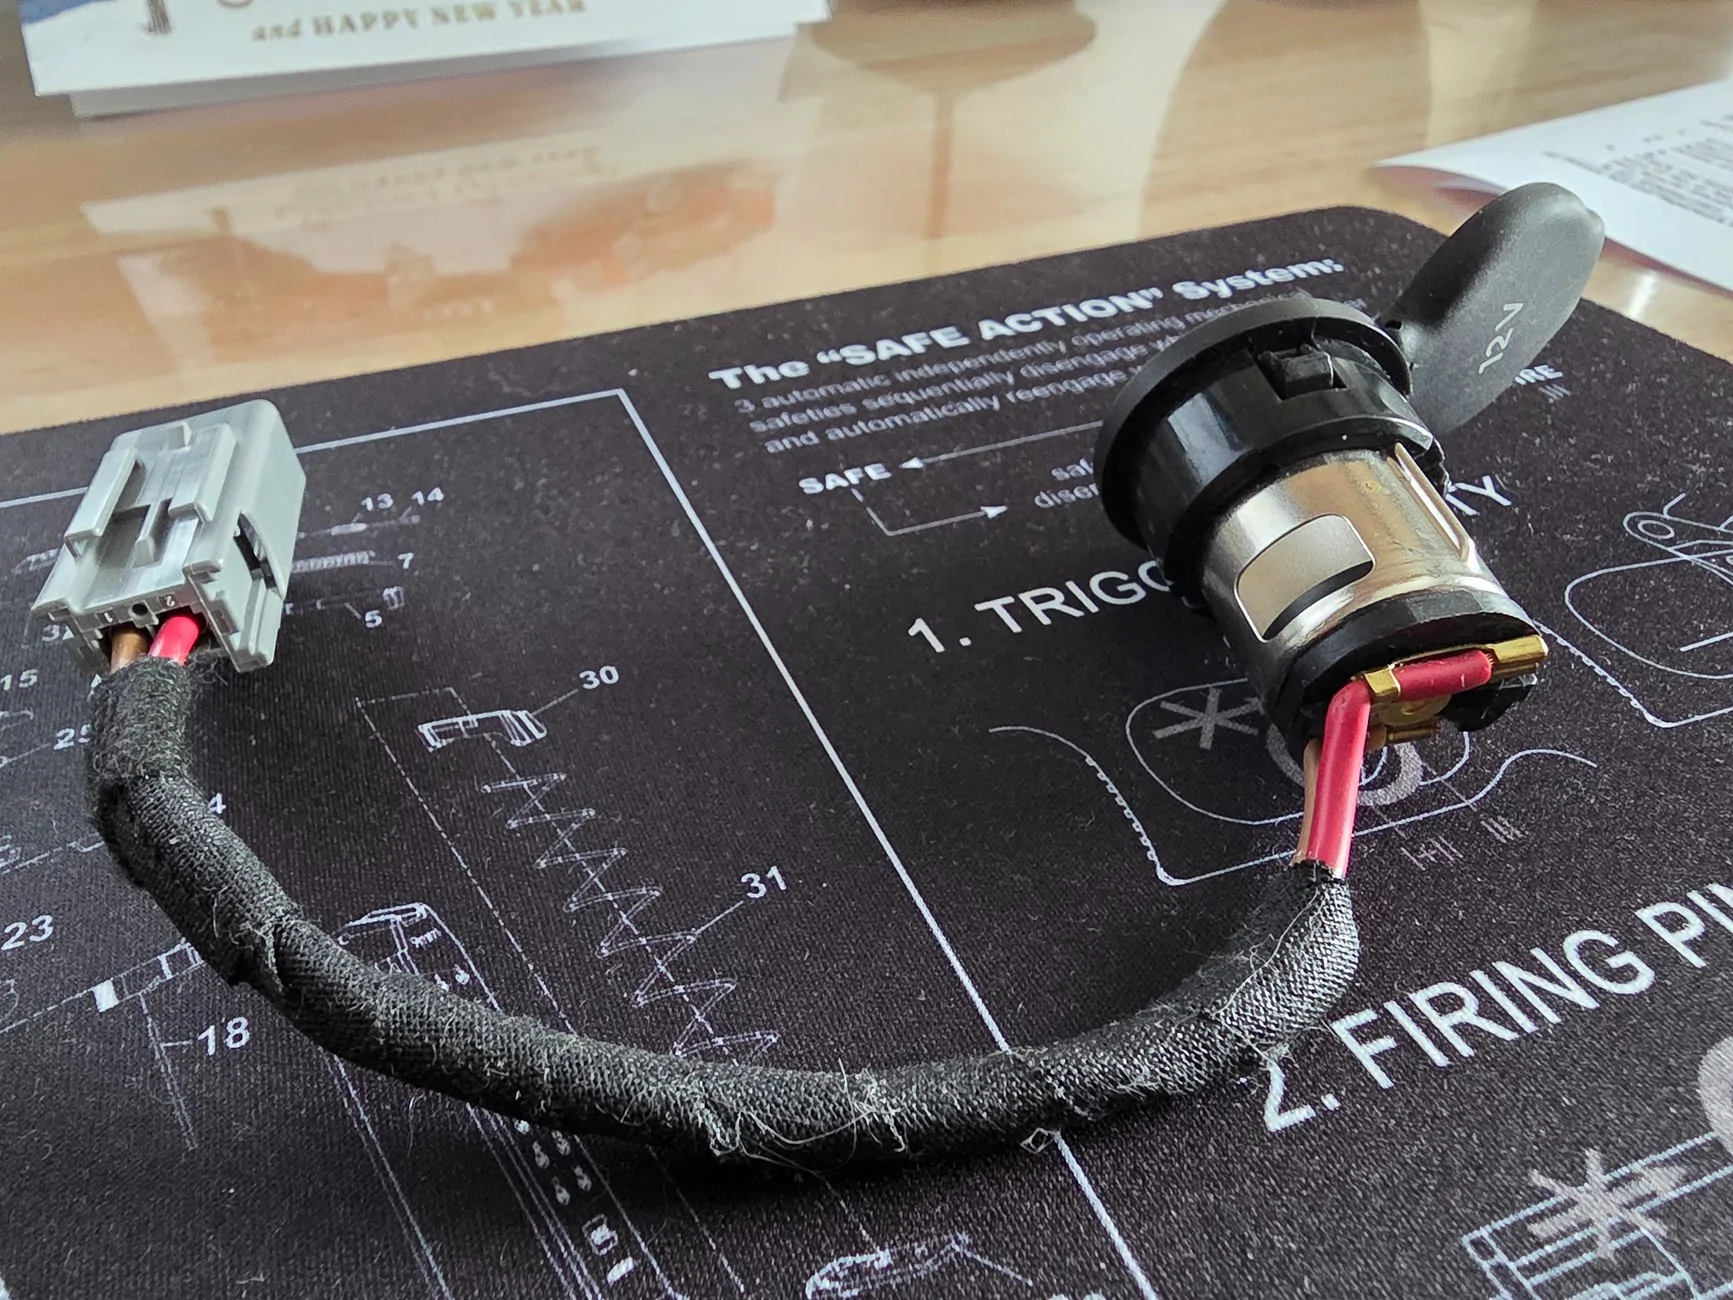
I finished my recent project: split the frunk 48v power line into 2 12V lines:

- Installed a 12V outlet in the frunk
- Made a custom housing for it to ensure itโ€™s super robust and looks OEM
- Ran it through an electrical 48V-to-12V splitter
- Made 2 parallel lines
- The second line runs the fridge inside.

The results:
- The fridge consumes about 25-30W while cooling down in eco mode (and works indefinitely! either Iโ€™m charging or not)
- When I plug in the Blue Yeti power station (as a test), it consumes an additional 80W (110W in total)
- Both lines have fuses: 15A for the fridgeโ€™s line and 20A for the 12V outlet

Just finished, and Iโ€™m freaking happy with how it came out ๐Ÿ˜…

PS BTW if you want to do the same thing (which I obviously recommend), I put all the materials, including my 3D files in the description of the video, you are free to use them. 3D files are available for free, it's an easy 3 hour print. And I rewired everything shortly after and it took me just merely 2 hours for everything. It's pretty easy when you know what to do ๐Ÿ˜…

And the how to video:


Tesla Cybertruck Split the 48v power line to a 12v socket in frunk. It now powers the console fridge INSIDE cabin ๐Ÿ˜Ž IMG_2415

Tesla Cybertruck Split the 48v power line to a 12v socket in frunk. It now powers the console fridge INSIDE cabin ๐Ÿ˜Ž IMG_2417

Tesla Cybertruck Split the 48v power line to a 12v socket in frunk. It now powers the console fridge INSIDE cabin ๐Ÿ˜Ž IMG_2416


Tesla Cybertruck Split the 48v power line to a 12v socket in frunk. It now powers the console fridge INSIDE cabin ๐Ÿ˜Ž IMG_2419
Sponsored

 
Last edited:

jahansolu

Well-known member
First Name
Jahan
Joined
Oct 17, 2024
Threads
43
Messages
368
Reaction score
919
Location
Vancouver
Vehicles
M3, Cybertruck
Country flag
@Leo Snow , are you an engineer? Reason I ask is you've done such a fantastic and meticulous job. Your attention to detail is awesome as I noticed you added a little rubber stopper on the lid of the CyberFridge.
You earned a subscriber, thanks!
 
OP
OP
Leo Snow

Leo Snow

Well-known member
First Name
Leo
Joined
Nov 3, 2024
Threads
26
Messages
128
Reaction score
235
Location
Kelowna
Vehicles
Cybertruck AWD, Model Y
Country flag
Software engineer (a long time ago) if it counts ๐Ÿ™ƒ. But I'm recently very into 3D printing, engineering, woodworking, and making different things, so I understand how part of those things work (let's put it this way).
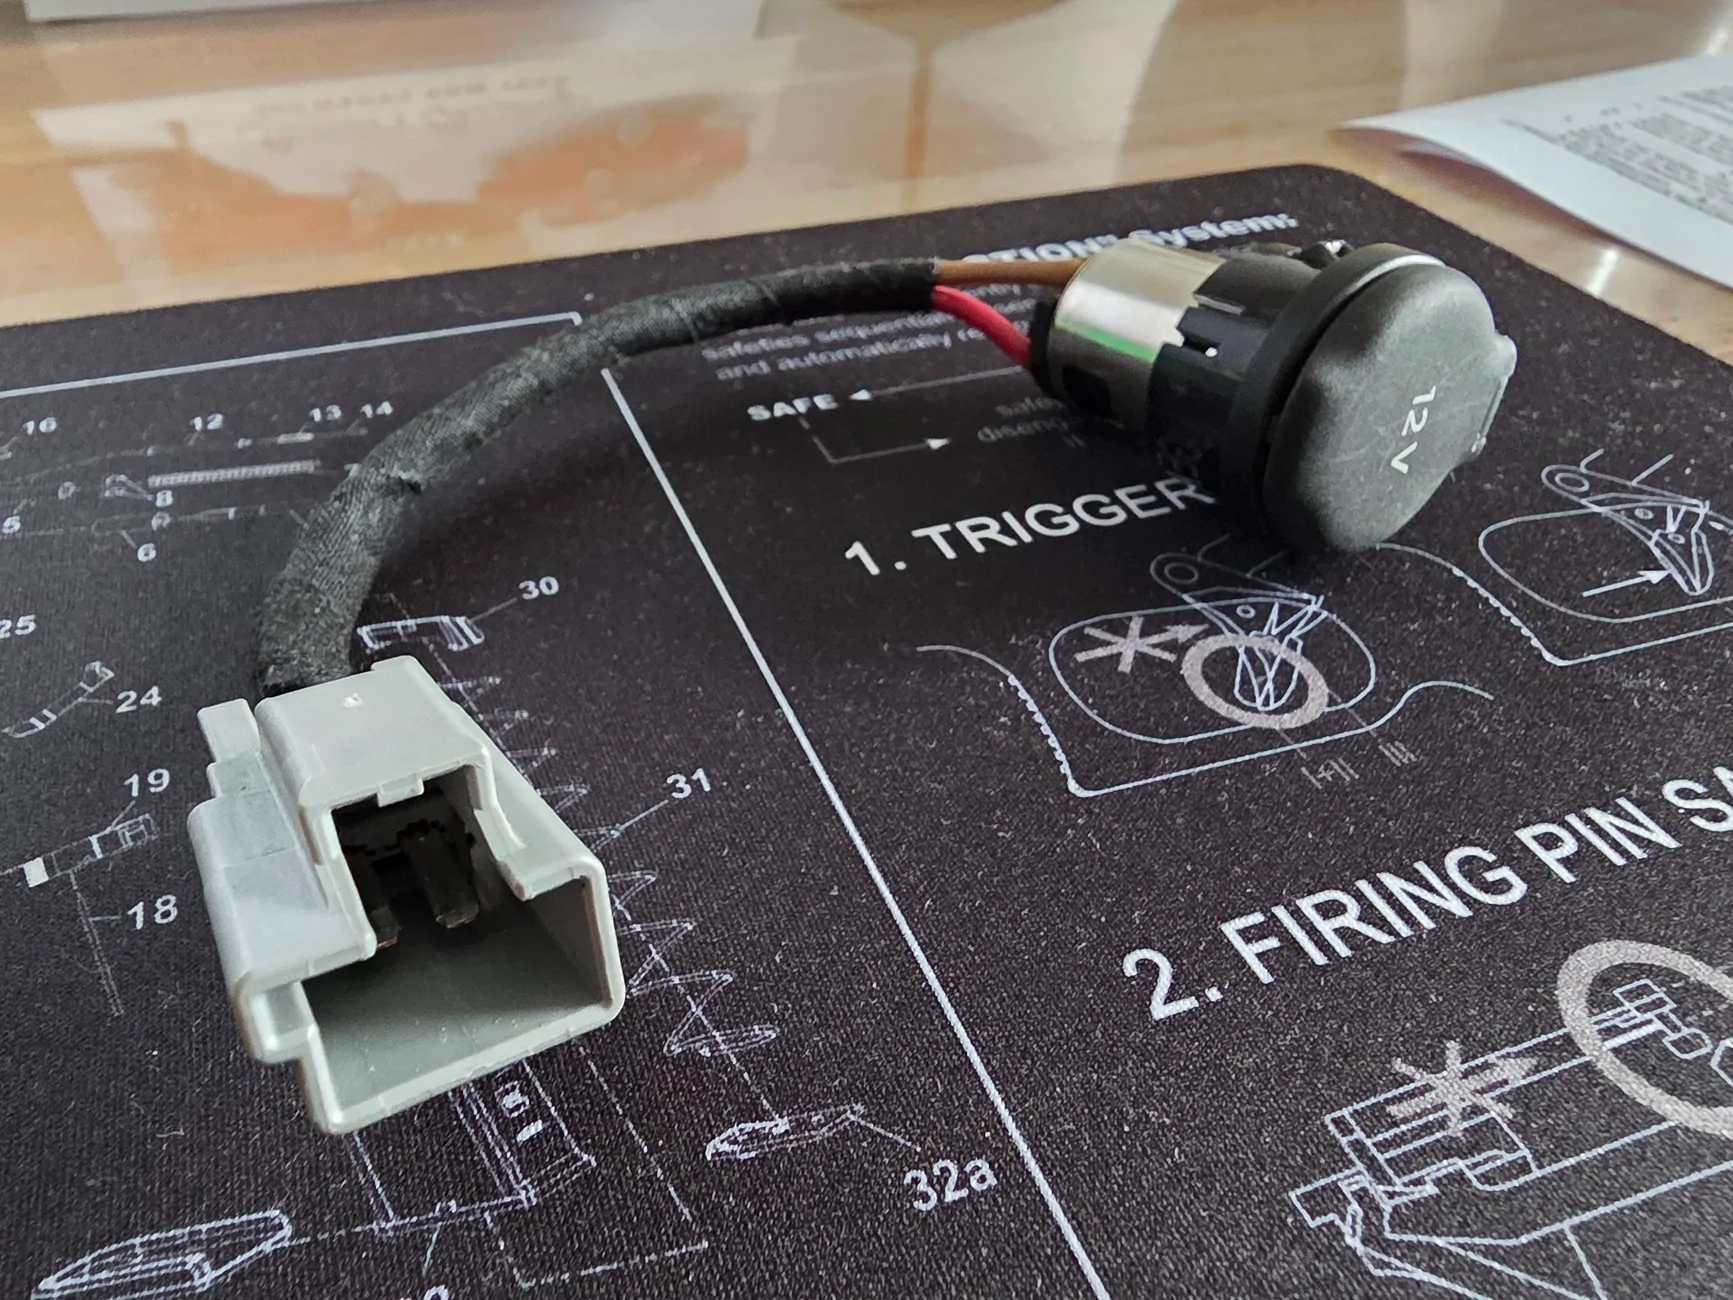
 

hemiarch

Well-known member
First Name
Ace
Joined
Jan 22, 2025
Threads
116
Messages
8,488
Reaction score
9,767
Location
Arizona
Vehicles
2024 foundation AWD, 2024 model x
Occupation
Trauma Surgeon
Country flag
First of all. Amazing video. As always. Thank you. Youโ€™re also a considerably better aurator than I was able to be. Canโ€™t tell you how many times Iโ€™ve tried to come up with a good way to explain this in DMโ€™s from the many people who appear to be interested.

This is a better solution than either of my previous ones. The first was to charge a power station in the frunk off of the frunk feed and then run dc from that into the cabin for fridge power, and the second was to maintain a cabin battery using a cabin usb-c to run the fridge. That solution does work well but involves using a battery which could potentially fail.

Will be revising to your setup. In my case Iโ€™ll be powering the cabin Starlink too the same way I think.

This may actually be a good application for the device @ABILISK posted from t-sportline with the split 12v cables and the little mounting bracket.

@CT_AZ_4x4 and I both used the hole in that door area to pass cables but it sounds like youโ€™ve found a neater solution. Iโ€™m ecstatic about that because it was very hard to explain to people how I did that. I just wiggled a lot until I was able to get through both inside and outside hole. I even see my pictures in your video. Could you please post a few more closeups of exactly how you got out of the cabin and into that weather seal? Would like to replicate it but Iโ€™m not sure I exactly understand where it runs.

Anybody have any wisdom on which buck converter to choose?

Btw, I was planning something similar for a frunk supply but the part I bought was thisโ€ฆ
https://a.co/d/3SdfRzb
Logic there was that I HATE lighter sockets.
Anderson connectors may be more reliable in terms of pulling out and there are also a million ready made connectors from them to various dc plugs.


OP
OP
Leo Snow

Leo Snow

Well-known member
First Name
Leo
Joined
Nov 3, 2024
Threads
26
Messages
128
Reaction score
235
Location
Kelowna
Vehicles
Cybertruck AWD, Model Y
Country flag
Buy a Tesla used part on eBay, which looks more original
I looked at it, it is not the best option in my opinion because:
1. It's more difficult to make it seat properly in the spot where you need to drill. The surface for the mount isn't ideal, it is more difficult to come up with a robust part for it
2. The TPU part will look much better and will insulate from elements better than a silicon cap over time due to less wear and tear
3. This connector isn't the best idea for the frunk imo
 

CT_AZ_4x4

Well-known member
First Name
Jay
Joined
May 22, 2024
Threads
46
Messages
841
Reaction score
1,406
Location
Scottsdale, AZ
Vehicles
AWD CT
Occupation
Self employed
Country flag
First of all. Amazing video. As always. Thank you. Youโ€™re also a considerably better aurator than I was able to be. Canโ€™t tell you how many times Iโ€™ve tried to come up with a good way to explain this in DMโ€™s from the many people who appear to be interested.

This is a better solution than either of my previous ones. The first was to charge a power station in the frunk off of the frunk feed and then run dc from that into the cabin for fridge power, and the second was to maintain a cabin battery using a cabin usb-c to run the fridge. That solution does work well but involves using a battery which could potentially fail.

Will be revising to your setup. In my case Iโ€™ll be powering the cabin Starlink too the same way I think.

This may actually be a good application for the device @ABILISK posted from t-sportline with the split 12v cables and the little mounting bracket.

@CT_AZ_4x4 and I both used the hole in that door area to pass cables but it sounds like youโ€™ve found a neater solution. Iโ€™m ecstatic about that because it was very hard to explain to people how I did that. I just wiggled a lot until I was able to get through both inside and outside hole. I even see my pictures in your video. Could you please post a few more closeups of exactly how you got out of the cabin and into that weather seal? Would like to replicate it but Iโ€™m not sure I exactly understand where it runs.

Anybody have any wisdom on which buck converter to choose?

Btw, I was planning something similar for a frunk supply but the part I bought was thisโ€ฆ
https://a.co/d/3SdfRzb
Logic there was that I HATE lighter sockets.
Anderson connectors may be more reliable in terms of pulling out and there are also a million ready made connectors from them to various dc plugs.
I can provide you a buck converter gratis. Iโ€™ve got three in the garage. They are all probably made in the same factory in China, lol. I even have one with the little mounting plate that has 4 outputs.
 

hemiarch

Well-known member
First Name
Ace
Joined
Jan 22, 2025
Threads
116
Messages
8,488
Reaction score
9,767
Location
Arizona
Vehicles
2024 foundation AWD, 2024 model x
Occupation
Trauma Surgeon
Country flag
I can provide you a buck converter gratis. Iโ€™ve got three in the garage. They are all probably made in the same factory in China, lol. I even have one with the little mounting plate that has 4 outputs.
Cool. Thanks j.
Question, if I split off before the buck converter, I can have both a 48v frunk power supply through that Anderson connector and also 12v output after the buck convertor going to the cabin right?
 
OP
OP
Leo Snow

Leo Snow

Well-known member
First Name
Leo
Joined
Nov 3, 2024
Threads
26
Messages
128
Reaction score
235
Location
Kelowna
Vehicles
Cybertruck AWD, Model Y
Country flag
Cool. Thanks j.
Question, if I split off before the buck converter, I can have both a 48v frunk power supply through that Anderson connector and also 12v output after the buck convertor going to the cabin right?
Yep, that'll do. You'll have a 48v line and 12v line. Just keep in mind that it provides 400 W max. That is enough for almost everything, but it also splits between accessories.
For example, the fridge consumes about 30(ECO mode)โ€“60 W depending on the mode. That leaves you with 400 W minus 30 W (or 60W), which is 370W (or 340W) for your other accessories.
Also, every split or connector adds some extra resistance, which might affect the voltage. Basically, two or three is fine. If you use more, test with a multimeter to be on the safe side.
It's quite simple to understand - it's just a basic resource re-allocation.

First of all. Amazing video. As always. Thank you. Youโ€™re also a considerably better aurator than I was able to be. Canโ€™t tell you how many times Iโ€™ve tried to come up with a good way to explain this in DMโ€™s from the many people who appear to be interested.
Thank you! These things are way more exhausting to film than it might look from the side, heh.


This is a better solution than either of my previous ones. The first was to charge a power station in the frunk off of the frunk feed and then run dc from that into the cabin for fridge power, and the second was to maintain a cabin battery using a cabin usb-c to run the fridge. That solution does work well but involves using a battery which could potentially fail.

Will be revising to your setup. In my case Iโ€™ll be powering the cabin Starlink too the same way I think.
Yep, I did it with the battery first as wall (since it was more convenient than plugging it into the AC outlet for the road trip we had) but the battery gave up at some point, a couple of weeks after we came back. I think the BMS got cooked, and I couldn't revive it and I didn't want to risk and salvage it even though the most of the battery cells were probably still fine.

Given that it happened in the summer, I'm lucky I found it before something worse happened, so I decided to just dive into this project, heh.

This may actually be a good application for the device @ABILISK posted from t-sportline with the split 12v cables and the little mounting bracket.
Confirm, it's definitely a better solution than just tape. Over time, I'll probably design something similar and 3D print it from carbon-fiber-reinforced filament. But the tape will hold, I'm pretty certain in this type of tape for this kind of application. I'll take care of that when it gets a bit warmer outside :)

Btw, I was planning something similar for a frunk supply but the part I bought was thisโ€ฆ
https://a.co/d/3SdfRzb
Logic there was that I HATE lighter sockets.
Anderson connectors may be more reliable in terms of pulling out and there are also a million ready made connectors from them to various dc plugs.
It'll do too. I simply didn't want to risk it: the area where you drill is thin plastic, and most 12V sockets don't have any beefy mounts (it's usually a thin ABS ring). When you install it and you insert anything in there, you apply some force at 90 degree on that loose mount. Maybe I'm just overprotective. I genuinely think it'll work, I just hate coming back to fix something that gave up, I'd better overdo :D

@CT_AZ_4x4 and I both used the hole in that door area to pass cables but it sounds like youโ€™ve found a neater solution. Iโ€™m ecstatic about that because it was very hard to explain to people how I did that. I just wiggled a lot until I was able to get through both inside and outside hole. I even see my pictures in your video. Could you please post a few more closeups of exactly how you got out of the cabin and into that weather seal? Would like to replicate it but Iโ€™m not sure I exactly understand where it runs.

Anybody have any wisdom on which buck converter to choose?
Will do tomorrow (it's already dark outside ๐Ÿ˜ฎโ€๐Ÿ’จ).

Get any converter with 4+ stars and more than 30 to 40 reviews. They're all pretty much the same, made in China, you just need 48 to 12 V. The solution I saw from T-sportline looks identical to what I picked, but with Deutsch connectors preinstalled (if I'm correct) and the mount.
 

hemiarch

Well-known member
First Name
Ace
Joined
Jan 22, 2025
Threads
116
Messages
8,488
Reaction score
9,767
Location
Arizona
Vehicles
2024 foundation AWD, 2024 model x
Occupation
Trauma Surgeon
Country flag
Confirm, it's definitely a better solution than just tape. Over time, I'll probably design something similar and 3D print it from carbon-fiber-reinforced filament. But the tape will hold, I'm pretty certain in this type of tape for this kind of application. I'll take care of that when it gets a bit warmer outside
Yeah. Nano-tape is the shiz. I donโ€™t see that being a problem moving forward. I just kind of like the little bracket they offer.


REM

Well-known member
Joined
Dec 9, 2023
Threads
14
Messages
3,611
Reaction score
6,707
Location
NC
Vehicles
2020 Model 3 Standard Range++ & Diet Cybertruck, Dual Motor
Occupation
Professional Retard
Country flag
This type of stuff is a decent stopgap for a lack of v48 devices, thanks for posting.

We really should be pressuring companies to make v48 gear too.
 
OP
OP
Leo Snow

Leo Snow

Well-known member
First Name
Leo
Joined
Nov 3, 2024
Threads
26
Messages
128
Reaction score
235
Location
Kelowna
Vehicles
Cybertruck AWD, Model Y
Country flag
I think even if we switch to the 48 volt architecture anytime soon, it will unfortunately still take a number of years for the new accessories to catch up with the 12v ones. I mean volume/variety wise. But, yeah, it definitely should happen. I'm pretty certain there is no way the next Roadster is 12v ๐Ÿ˜„
 
  • Like
Reactions: REM

REM

Well-known member
Joined
Dec 9, 2023
Threads
14
Messages
3,611
Reaction score
6,707
Location
NC
Vehicles
2020 Model 3 Standard Range++ & Diet Cybertruck, Dual Motor
Occupation
Professional Retard
Country flag
One suggestion after watching the video completely is to replace that wago connector with an automotive certified connector.

The one you currently have in the frunk isn't vibration or water intrusion certified and can easily fail.


Top