personage

Well-known member
Joined
May 10, 2024
Threads
2
Messages
79
Reaction score
78
Location
IL
Vehicles
Cybertruck
Country flag
Yeah the hole would not fit the connector but the Morimoto lights use a standard DT connector. There are many for sale on Amazon like these. I bet the holes are big enough to feed two pair of 14-16 gauge wire through.

https://www.amazon.com/JRready-Waterproof-Connectors-connectors-Connector(ST9020/dp/B09MM9VGNZ?th=1

Then splice and dice out of view and the bare wires could be hidden in wire loom or shrink wrap.

https://www.amazon.com/s?k=mesh+wire+loom
https://www.amazon.com/JANDECCN-Terminal-Splicing-Connectors-28-12AWG/dp/B0BWTF8QZW?th=1
Thank you. Looks like I should be able to take apart the connector and reassemble it.


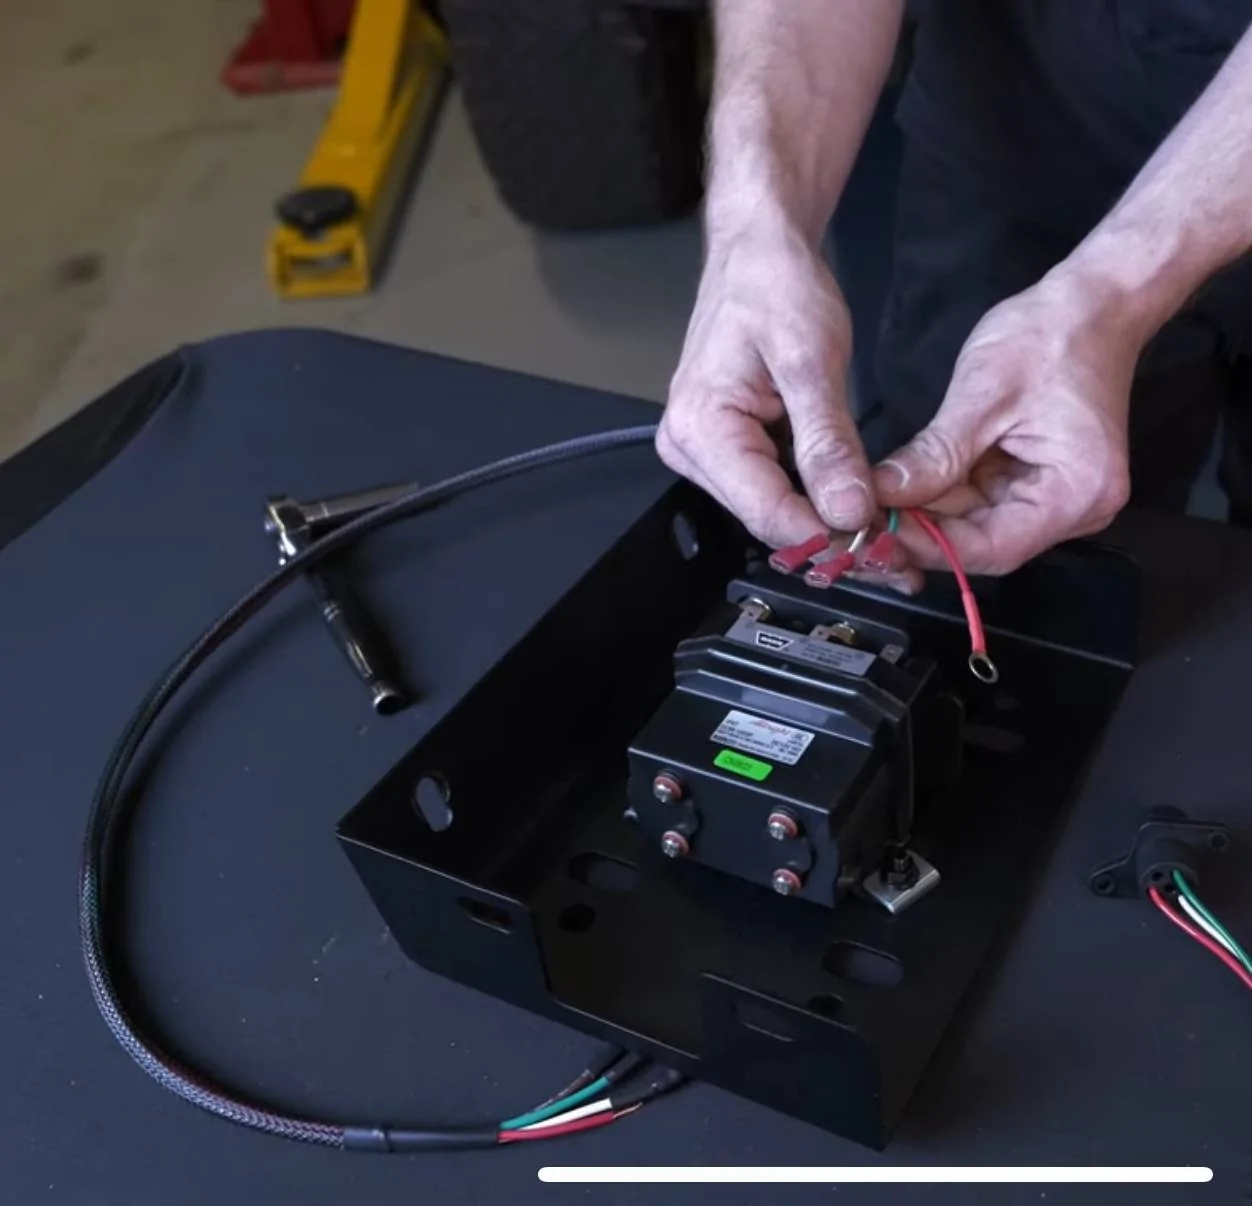
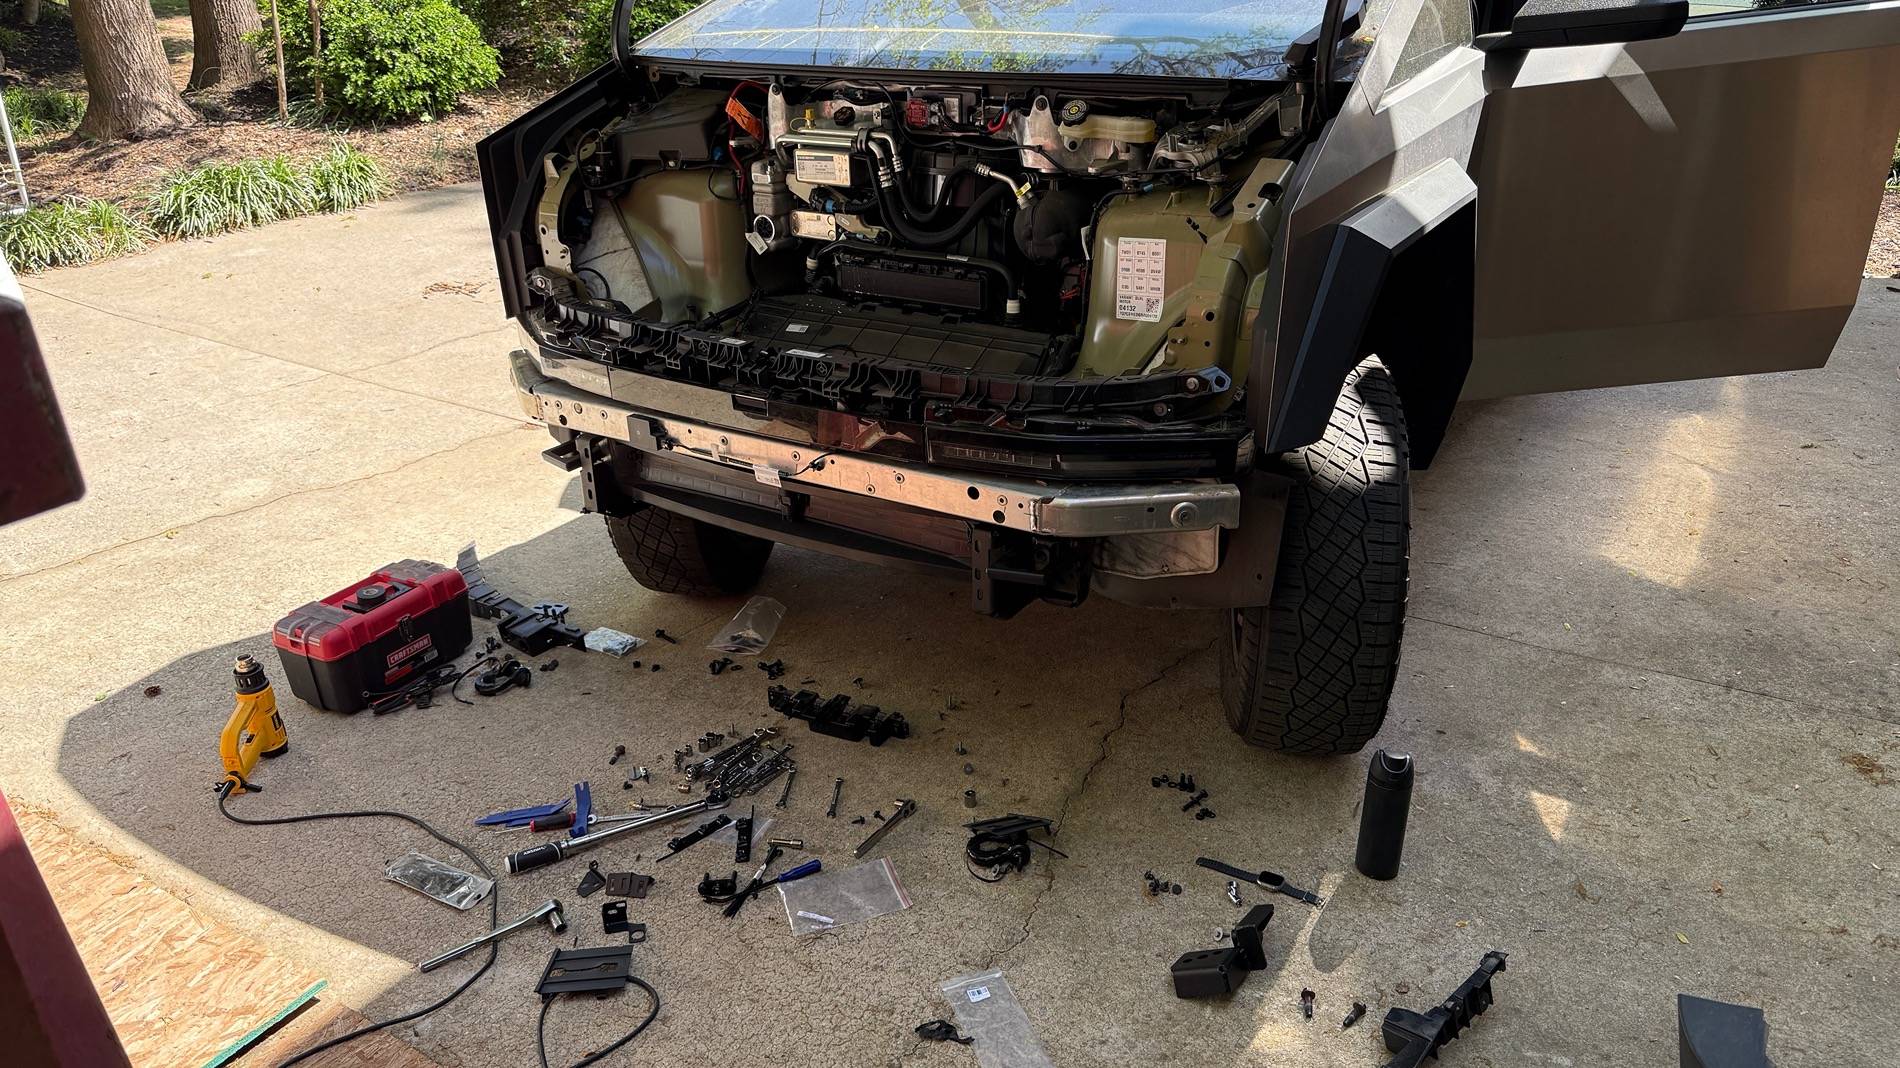
Edit: At 3:24 shows disassembly.
Sponsored


Derektsla

Well-known member
First Name
Derek
Joined
Dec 13, 2023
Threads
18
Messages
359
Reaction score
857
Location
Greenville, SC
Vehicles
Cybertruck AWD, Model X
Occupation
Entrepreneur
Country flag
For others going to install this bumper soon. Here is a list of all the tools required for each step of the CTX bumper compiled from all the install videos. (Combined Master List at the end).


Bumper Removal
  • Torx
    • T25, T20, T8 (T-handle preferred)
  • ¼ drive ratchet w/ 3ā€ extension
  • Sockets
    • 10mm Socket
  • Trim Removal Tools
  • Flat Screwdriver

Installing the CTX Front Bumper

  • Torque Wrench (ft/lbs 35-55 range)
  • 3/8 socket w/ 3ā€ extender
  • Small Phillips and Flat Head Drivers
  • Trim Removal Tools
  • Torx
    • T25
  • Snipping Tool
  • Wrenches
    • 10mm, 13mm, 15mm, 16mm, 18mm
  • Hex Key bit
    • 6, 5, 4
  • Socket
    • 10, 13, 15, 16
    • 18 (Need long, short and swivel)

Installing Auxiliary Power Systems (Voltage Regulator and Bracket)
  • Sockets
    • 7mm, 13mm (Long, ¼ & 3/8 drive)
  • Trim Removal Tools
  • Wire Strippers
  • Heat Gun

120ah or 100ah Auxiliary 12v Battery System
  • Sockets
    • 10mm, 11mm, 13mm
  • Wrenches
    • 10mm
  • Wire Cutters & Wires Strippers
  • Small Pry Tool (or small trim tool)
  • Screwdrivers
    • Phillips #2, #0
    • Flathead 3/6 (medium), Small detail flathead
  • Heat Gun

Installing Lighting Kits

  • Wrenches
    • 17mm
  • Hex
    • 6mm, 5mm
  • Torx
    • T30 Socket
  • Snipping Tool
  • Small Zip Ties

Installing Winches
  • Sockets (Long w/ 3/8 wrench)
    • 16mm, 13mm, 10mm, 8mm
    • Extension
  • Wrenches
    • 13mm (x2)
  • Screwdrivers
    • Phillips
  • Hex
    • 6mm, 2.5mm
  • Pliers (Various w/ cutting)

MASTER LIST OF TOOLS

Sockets:

  • ¼ Drive: 7mm (long), 10mm, 11mm, 13mm (long)
  • 3/8 Drive: 15mm, 16mm (long), 18mm
  • Swivel: 18mm
  • Extensions: 3ā€ (¼ drive & 3/8 drive), (for winch)
Wrenches:
  • 10mm, 13mm (x2), 15mm, 16mm, 17mm, 18mm
Hex Keys/Bits:
  • 2.5mm, 4mm, 5mm, 6mm
Torx:
  • T8, T20, T25 (T-handle preferred), T30 (Socket)
Screwdrivers:
  • Phillips: #0, #2, Small Phillips
  • Flathead: Medium, Small
Trim Removal Tools:
  • Various sizes
Cutting Tools:
  • Snipping Tool, Various Pliers (with cutting)
Electrical Tools:
  • Wire Strippers & Cutters
  • Heat Gun
Miscellaneous:
  • Small Pry Tool (or small trim tool)
  • Torque Wrench (ft/lbs 35-100 range)
  • Small Zip Ties
 
Last edited:
OP
OP
CyberNickOH

CyberNickOH

Well-known member
First Name
Nick
Joined
Jan 9, 2024
Threads
13
Messages
366
Reaction score
403
Location
Powell, OH
Vehicles
2024 Tesla CT AWD FS
Country flag
This part of the bumper rests on the chassis, so there isn't much room under the lights. I wouldn't be surprised if button head light bolts are right on top.
For others going to install this bumper soon. Here is a list of all the tools required for each step of the CTX bumper compiled from all the install videos. (Combined Master List at the end).


Bumper Removal
  • Torx
    • T25, T20, T8 (T-handle preferred)
  • ¼ drive ratchet w/ 3ā€ extension
  • Sockets
    • 10mm Socket
  • Trim Removal Tools
  • Flat Screwdriver

Installing the CTX Front Bumper

  • Torque Wrench (ft/lbs 35-55 range)
  • 3/8 socket w/ 3ā€ extender
  • Small Phillips and Flat Head Drivers
  • Trim Removal Tools
  • Torx
    • T25
  • Snipping Tool
  • Wrenches
    • 10mm, 13mm, 15mm, 16mm, 18mm
  • Hex Key bit
    • 6, 5, 4
  • Socket
    • 10, 13, 15, 16
    • 18 (Need long, short and swivel)

Installing Auxiliary Power Systems (Voltage Regulator and Bracket)
  • Sockets
    • 7mm, 13mm (Long, ¼ & 3/8 drive)
  • Trim Removal Tools
  • Wire Strippers
  • Heat Gun

120ah or 100ah Auxiliary 12v Battery System
  • Sockets
    • 10mm, 11mm, 13mm
  • Wrenches
    • 10mm
  • Wire Cutters & Wires Strippers
  • Small Pry Tool (or small trim tool)
  • Screwdrivers
    • Phillips #2, #0
    • Flathead 3/6 (medium), Small detail flathead
  • Heat Gun

Installing Lighting Kits

  • Wrenches
    • 17mm
  • Hex
    • 6mm, 5mm
  • Torx
    • T30 Socket
  • Snipping Tool
  • Small Zip Ties

Installing Winches
  • Sockets (Long w/ 3/8 wrench)
    • 16mm, 13mm, 10mm, 8mm
    • Extension
  • Wrenches
    • 13mm (x2)
  • Screwdrivers
    • Phillips
  • Hex
    • 6mm, 2.5mm
  • Pliers (Various w/ cutting)

MASTER LIST OF TOOLS

Sockets:

  • ¼ Drive: 7mm (long), 10mm, 11mm, 13mm (long)
  • 3/8 Drive: 15mm, 16mm (long), 18mm
  • Swivel: 18mm
  • Extensions: 3ā€ (¼ drive & 3/8 drive), (for winch)
Wrenches:
  • 10mm, 13mm (x2), 15mm, 16mm, 17mm, 18mm
Hex Keys/Bits:
  • 2.5mm, 4mm, 5mm, 6mm
Torx:
  • T8, T20, T25 (T-handle preferred), T30 (Socket)
Screwdrivers:
  • Phillips: #0, #2, Small Phillips
  • Flathead: Medium, Small
Trim Removal Tools:
  • Various sizes
Cutting Tools:
  • Snipping Tool, Various Pliers (with cutting)
Electrical Tools:
  • Wire Strippers & Cutters
  • Heat Gun
Miscellaneous:
  • Small Pry Tool (or small trim tool)
  • Torque Wrench (ft/lbs 35-55 range)
  • Small Zip Ties
Good write up for sure. The only thing I think is off would be the torque wrench range. The main bumper bolts, the 6 B's as I refer to them, go to 100 ft/lbs.
 

Derektsla

Well-known member
First Name
Derek
Joined
Dec 13, 2023
Threads
18
Messages
359
Reaction score
857
Location
Greenville, SC
Vehicles
Cybertruck AWD, Model X
Occupation
Entrepreneur
Country flag
This part of the bumper rests on the chassis, so there isn't much room under the lights. I wouldn't be surprised if button head light bolts are right on top.


Good write up for sure. The only thing I think is off would be the torque wrench range. The main bumper bolts, the 6 B's as I refer to them, go to 100 ft/lbs.
Thanks! I might have missed that in the videos. I was working while watching them. Will update post.
 

Derektsla

Well-known member
First Name
Derek
Joined
Dec 13, 2023
Threads
18
Messages
359
Reaction score
857
Location
Greenville, SC
Vehicles
Cybertruck AWD, Model X
Occupation
Entrepreneur
Country flag
Did anyone else order the winch and battery but not the lights? I was going to get my own lights. I selected lights on the product page and put power unit only. The kit came with a battery charger, but I was also expecting a 48v to 12v step down box. I assume this would power the lights and go to the battery.

The videos didn’t specify a light and winch install together. The lights wouldn’t just connect to the battery. They need to connect to the trucks 48v, but the charger is connected to that. So not sure how this is supposed to work. šŸ¤·ā€ā™‚ļø


OP
OP
CyberNickOH

CyberNickOH

Well-known member
First Name
Nick
Joined
Jan 9, 2024
Threads
13
Messages
366
Reaction score
403
Location
Powell, OH
Vehicles
2024 Tesla CT AWD FS
Country flag
Did anyone else order the winch and battery but not the lights? I was going to get my own lights. I selected lights on the product page and put power unit only. The kit came with a battery charger, but I was also expecting a 48v to 12v step down box. I assume this would power the lights and go to the battery.

The videos didn’t specify a light and winch install together. The lights wouldn’t just connect to the battery. They need to connect to the trucks 48v, but the charger is connected to that. So not sure how this is supposed to work. šŸ¤·ā€ā™‚ļø
The lights will run off the battery. The charger…charges the battery whenever you need it, turn on frunk power. And you can download the charger app to see the draw.
 

Derektsla

Well-known member
First Name
Derek
Joined
Dec 13, 2023
Threads
18
Messages
359
Reaction score
857
Location
Greenville, SC
Vehicles
Cybertruck AWD, Model X
Occupation
Entrepreneur
Country flag
The lights will run off the battery. The charger…charges the battery whenever you need it, turn on frunk power. And you can download the charger app to see the draw.
I may be confused, but it doesn’t seem right.

- The winch has an on/off switch. The frunk power can be on and the battery can be charged/charging, but the winch won’t be on unless you activate it.
- Lights do not have an on/off switch. If they are connected to the battery, they will be ON until the battery dies. If the battery still has power, it would be impossible to turn off the lights.

In one of the videos (probably lighting one), there is a voltage regulator connected to the trucks 48v frunk power. If you switch the frunk power on, the lights turn on. This makes sense. I assume the battery and lights would be connected to the truck in parallel, not in series. As in: If I turn on the frunk power, it should start charging the battery (via battery charger) and turn on any lights in parallel. If I turn it off, lights go off and battery charging stops.

Just trying to figure this out before I start the install and run into an issue. I’m not an electrical engineer, but I do play one on TV 😳. There is probably an easy answer, but T-Sportline didn’t return my call today.
 
OP
OP
CyberNickOH

CyberNickOH

Well-known member
First Name
Nick
Joined
Jan 9, 2024
Threads
13
Messages
366
Reaction score
403
Location
Powell, OH
Vehicles
2024 Tesla CT AWD FS
Country flag
I may be confused, but it doesn’t seem right.

- The winch has an on/off switch. The frunk power can be on and the battery can be charged/charging, but the winch won’t be on unless you activate it.
- Lights do not have an on/off switch. If they are connected to the battery, they will be ON until the battery dies. If the battery still has power, it would be impossible to turn off the lights.

In one of the videos (probably lighting one), there is a voltage regulator connected to the trucks 48v frunk power. If you switch the frunk power on, the lights turn on. This makes sense. I assume the battery and lights would be connected to the truck in parallel, not in series. As in: If I turn on the frunk power, it should start charging the battery (via battery charger) and turn on any lights in parallel. If I turn it off, lights go off and battery charging stops.

Just trying to figure this out before I start the install and run into an issue. I’m not an electrical engineer, but I do play one on TV 😳. There is probably an easy answer, but T-Sportline didn’t return my call today.
The lights do have an on/off switch. That can mounted in the cab if desired. But the TS kit comes with key fobs to turn them on/off. 1 per set in my case. The wiring harness has a relay switch, they are not direct wired.
 

Derektsla

Well-known member
First Name
Derek
Joined
Dec 13, 2023
Threads
18
Messages
359
Reaction score
857
Location
Greenville, SC
Vehicles
Cybertruck AWD, Model X
Occupation
Entrepreneur
Country flag
The lights do have an on/off switch. That can mounted in the cab if desired. But the TS kit comes with key fobs to turn them on/off. 1 per set in my case. The wiring harness has a relay switch, they are not direct wired.
Really? Weird. In their videos, they discuss connecting the voltage regulator (which connects to lights) to the 48v frunk power so you can turn them on and off from the screen. The lights just plug into the voltage regulator and run when you power it. Having a separate key Fob is janky, would this be some sort of limitation if you are charging the battery as well?

In the order page, I selected Power system only… I was assuming this would have what I needed to connect other POD lights.


Tesla Cybertruck CTX Bumper / Wheels+Spacers / Black Matte PPF / Tint IMG_2937
 
OP
OP
CyberNickOH

CyberNickOH

Well-known member
First Name
Nick
Joined
Jan 9, 2024
Threads
13
Messages
366
Reaction score
403
Location
Powell, OH
Vehicles
2024 Tesla CT AWD FS
Country flag
If you wired directly to the 48v, with the down regulator, when you turn the frunk on, that would charge the battery and turn on the lights, no good. You can run the push button switches to the cab, I might do that. That’s more normal for extra lights, what my Bronco has. But with the lack of buttons in the CT, I haven’t found a good spot yet. So fobs it is for now.


Derektsla

Well-known member
First Name
Derek
Joined
Dec 13, 2023
Threads
18
Messages
359
Reaction score
857
Location
Greenville, SC
Vehicles
Cybertruck AWD, Model X
Occupation
Entrepreneur
Country flag
If you wired directly to the 48v, with the down regulator, when you turn the frunk on, that would charge the battery and turn on the lights, no good. You can run the push button switches to the cab, I might do that. That’s more normal for extra lights, what my Bronco has. But with the lack of buttons in the CT, I haven’t found a good spot yet. So fobs it is for now.
Thanks, this all makes sense now. I found more info on their website on a different page right before I saw your post.

This is the last time I preorder something that lacks all the details. I should have waited to buy, paid about the same price, had more details to make a better buying decision, and kept my money for 5 more months. I figured why not do the winch because of the slick package!? But with the design changes they made, and a few other of these details, I probably would not have pulled the trigger. It’s my fault, I was just expecting this amazing package for $5k, and it’s falling a bit short of my expectations. I guess in my head $5k was pushing the limits of the value of this setup to me. So any issues would frustrate me. šŸ˜ž - I’m done complaining, just had to get that out. Maybe after I install it I will get over this and go pull some stuff.
 

Derektsla

Well-known member
First Name
Derek
Joined
Dec 13, 2023
Threads
18
Messages
359
Reaction score
857
Location
Greenville, SC
Vehicles
Cybertruck AWD, Model X
Occupation
Entrepreneur
Country flag
I installed my CTX bumper today. Mostly went well… except… I don’t have an extension cable for the winch control box as shown in the image below. I was able to skip it and get the bumper on, but can’t finish without it. I’m trying to figure out if I didn’t get one, or if I’m missing something. The install took about 8 hours with me hustling. Probably another 1 hour to finish. I’ll post some tips later when I am all done.

Tesla Cybertruck CTX Bumper / Wheels+Spacers / Black Matte PPF / Tint IMG_2965


Tesla Cybertruck CTX Bumper / Wheels+Spacers / Black Matte PPF / Tint IMG_2961
 

hemiarch

Well-known member
First Name
Ace
Joined
Jan 22, 2025
Threads
22
Messages
1,080
Reaction score
1,163
Location
Arizona
Vehicles
2024 foundation AWD, 2024 model x
Occupation
Trauma Surgeon
Country flag
I installed my CTX bumper today. Mostly went well… except… I don’t have an extension cable for the winch control box as shown in the image below. I was able to skip it and get the bumper on, but can’t finish without it. I’m trying to figure out if I didn’t get one, or if I’m missing something. The install took about 8 hours with me hustling. Probably another 1 hour to finish. I’ll post some tips later when I am all done.

IMG_2965.jpeg


IMG_2961.jpeg
Whoa. I’m going to be honest here, I think it’s a really cool product and definitely consider myself a hobbyist Cybertruck mechanic, but that looks WAY more involved than I would ever want to undertake in my driveway or anywhere else for that matter. If I get that thing, I’m getting it professionally installed.

great job though. Kudos
 
OP
OP
CyberNickOH

CyberNickOH

Well-known member
First Name
Nick
Joined
Jan 9, 2024
Threads
13
Messages
366
Reaction score
403
Location
Powell, OH
Vehicles
2024 Tesla CT AWD FS
Country flag
I installed my CTX bumper today. Mostly went well… except… I don’t have an extension cable for the winch control box as shown in the image below. I was able to skip it and get the bumper on, but can’t finish without it. I’m trying to figure out if I didn’t get one, or if I’m missing something. The install took about 8 hours with me hustling. Probably another 1 hour to finish. I’ll post some tips later when I am all done.

IMG_2965.jpeg


IMG_2961.jpeg
My control box is different than yours, so I’m guessing you didn’t get the superwinch SX12R. Because for that one, when you detach the control box from the SW, the cables are long enough to run to the control box. Mine did come with a ground cable that’s long to run to the battery.
 

Derektsla

Well-known member
First Name
Derek
Joined
Dec 13, 2023
Threads
18
Messages
359
Reaction score
857
Location
Greenville, SC
Vehicles
Cybertruck AWD, Model X
Occupation
Entrepreneur
Country flag
My control box is different than yours, so I’m guessing you didn’t get the superwinch SX12R. Because for that one, when you detach the control box from the SW, the cables are long enough to run to the control box. Mine did come with a ground cable that’s long to run to the battery.
That’s correct, I went with the WARN winch. I honestly didn’t do a lot of research. In hindsight, I should have gone synthetic. The WARN steel roller bars are going to stick out like a sore thumb on the front. I was somehow thinking the rollers might be partially hidden behind the bumper, but they obviously are not. For anyone who wants the slick look in their pictures, go with synthetic.

I’m going to have to wire up my own custom extension for the controller. I don’t want to wait however long it takes to ship me a new one and it’s going to be raining the next few days.
Sponsored


Top