OP
OP
CyberNickOH

CyberNickOH

Well-known member
First Name
Nick
Joined
Jan 9, 2024
Threads
13
Messages
366
Reaction score
403
Location
Powell, OH
Vehicles
2024 Tesla CT AWD FS
Country flag
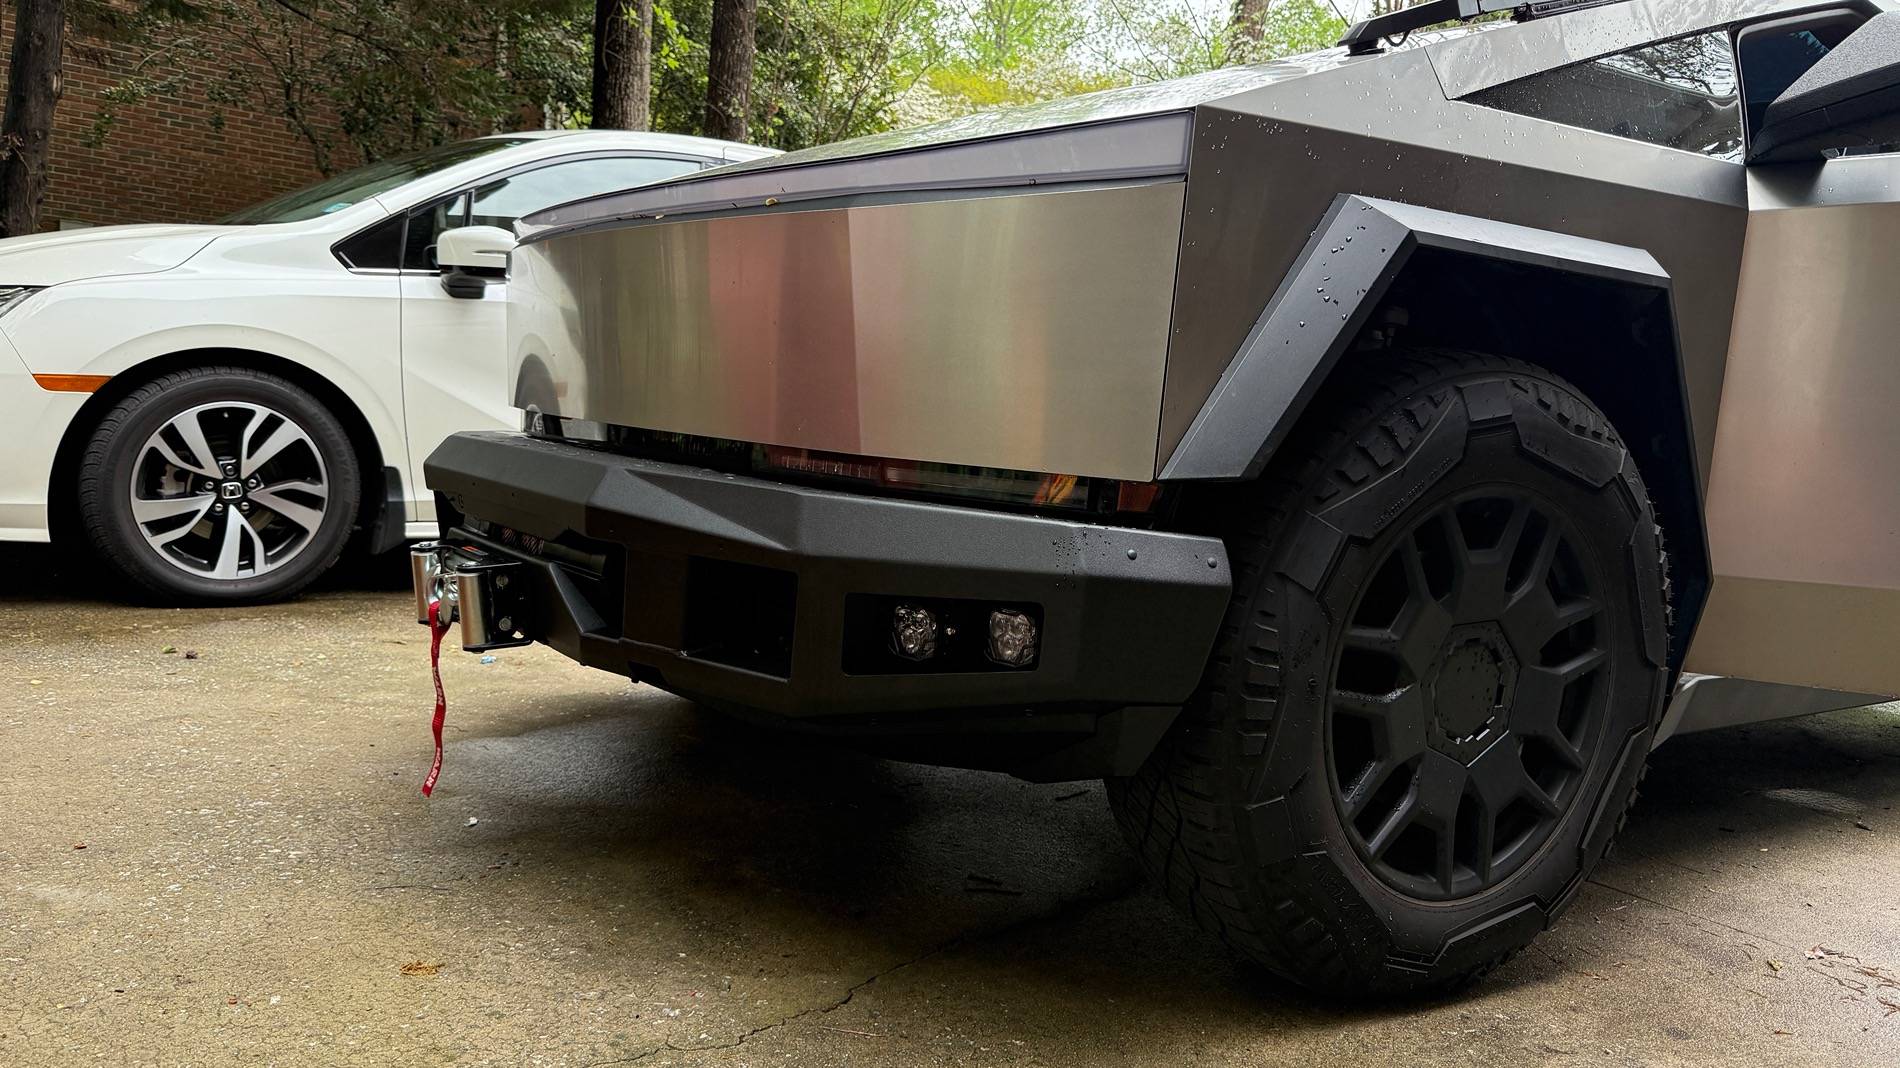
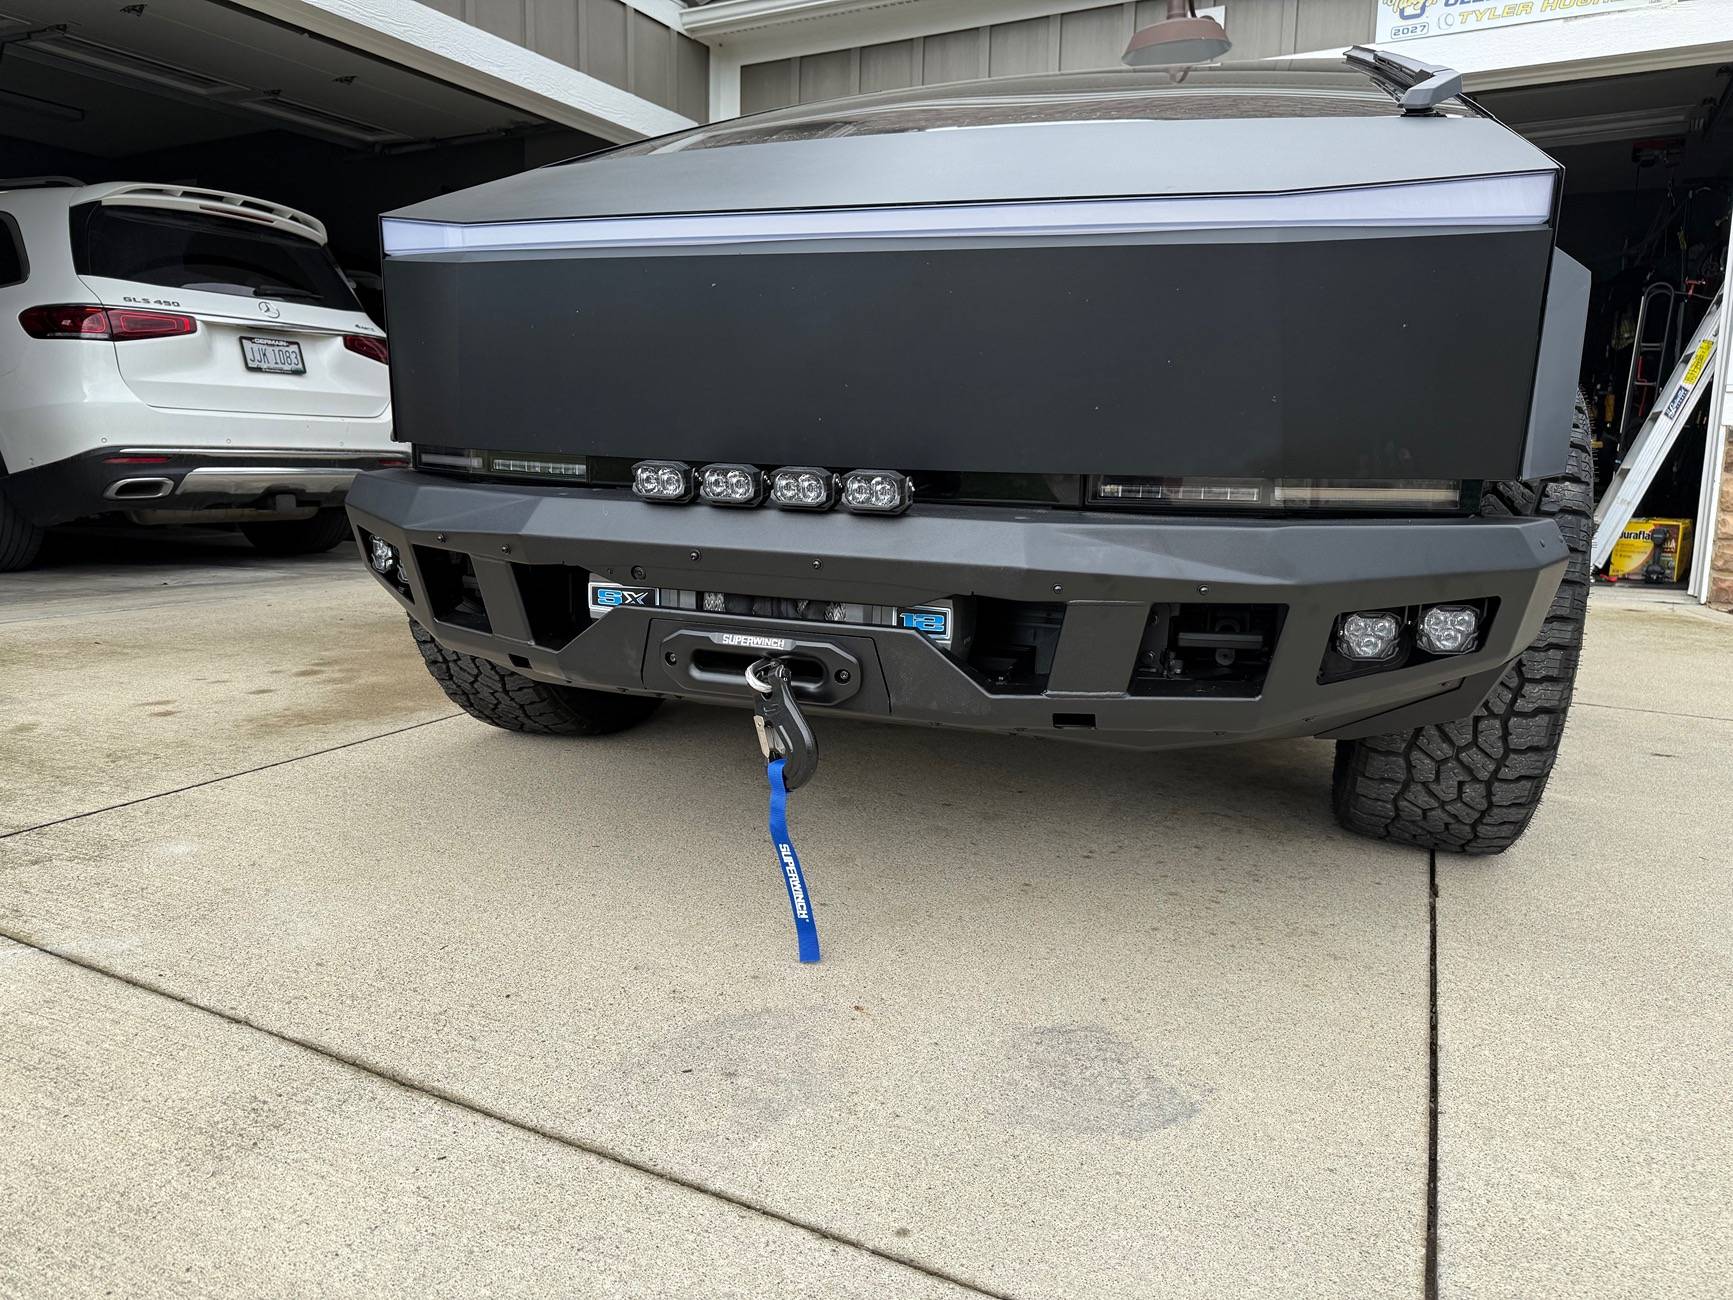
I think you could probably buy a replacement synthetic line and a normal fairlead. But I would call Warn before doing that.
Sponsored


personage

Well-known member
Joined
May 10, 2024
Threads
2
Messages
79
Reaction score
78
Location
IL
Vehicles
Cybertruck
Country flag
That’s correct, I went with the WARN winch. I honestly didn’t do a lot of research. In hindsight, I should have gone synthetic. The WARN steel roller bars are going to stick out like a sore thumb on the front. I was somehow thinking the rollers might be partially hidden behind the bumper, but they obviously are not. For anyone who wants the slick look in their pictures, go with synthetic.

I’m going to have to wire up my own custom extension for the controller. I don’t want to wait however long it takes to ship me a new one and it’s going to be raining the next few days.
I got WARN as well and went with synthetic line to avoid the rollers. Haven't opened the box yet, as I am still messing with the lights. Looking forward to see how yours turns out
 

personage

Well-known member
Joined
May 10, 2024
Threads
2
Messages
79
Reaction score
78
Location
IL
Vehicles
Cybertruck
Country flag
Looking at T-Sportlines pictures they appear to be mounting the 2 banger Morimoto's lights with one bolt each. I circled one in the picture. Morimoto does sell a link kit so you can make a lightbar (bangerbar) out of them and have mounting points only on the ends.

https://www.morimotohid.com/Links-Mounting-Accessories-BangerBar-Single-Row-2Banger?quantity=1

You'd have to buy 3 link kits $105. If you went that route the two middle holes could be used to route the wires under the lights rather than the back of the bumper. Each light comes with a mounting bracket which 2 could be modified by cutting one end off. A file and some black spray paint and who would know. I put a red line on one of the pictures. That way the slot on both sides will allow for positioning. Morimoto does sell an end kit at the same link but the holes would not work for mounting.

Morimoto uses a standard DT connector so you can combine two lights into one harness.

https://www.amazon.com/dp/B09T3GMXLQ
This idea worked well. I got the link kits, cut two of the mounting brackets, and assembled the light bar. It is solid. I cut holes in two of the rubber plugs that come with the bumper and ran the Y cable harnesses though them. The connectors are very easy to take apart and reassemble.

This definitely looks better than having cables run across the bumper, but I wish there was a right angle plug because the bends look pretty extreme.
Tesla Cybertruck CTX Bumper / Wheels+Spacers / Black Matte PPF / Tint IMG_4940

Tesla Cybertruck CTX Bumper / Wheels+Spacers / Black Matte PPF / Tint IMG_4943
Tesla Cybertruck CTX Bumper / Wheels+Spacers / Black Matte PPF / Tint IMG_4944
Tesla Cybertruck CTX Bumper / Wheels+Spacers / Black Matte PPF / Tint IMG_4952
Tesla Cybertruck CTX Bumper / Wheels+Spacers / Black Matte PPF / Tint IMG_4957
Tesla Cybertruck CTX Bumper / Wheels+Spacers / Black Matte PPF / Tint IMG_4959
Tesla Cybertruck CTX Bumper / Wheels+Spacers / Black Matte PPF / Tint IMG_4960
Tesla Cybertruck CTX Bumper / Wheels+Spacers / Black Matte PPF / Tint IMG_4962
Tesla Cybertruck CTX Bumper / Wheels+Spacers / Black Matte PPF / Tint IMG_4964
Tesla Cybertruck CTX Bumper / Wheels+Spacers / Black Matte PPF / Tint IMG_4966
Tesla Cybertruck CTX Bumper / Wheels+Spacers / Black Matte PPF / Tint IMG_4968
Tesla Cybertruck CTX Bumper / Wheels+Spacers / Black Matte PPF / Tint IMG_4969
Tesla Cybertruck CTX Bumper / Wheels+Spacers / Black Matte PPF / Tint IMG_4972
Tesla Cybertruck CTX Bumper / Wheels+Spacers / Black Matte PPF / Tint IMG_4973
Tesla Cybertruck CTX Bumper / Wheels+Spacers / Black Matte PPF / Tint IMG_4974
 
Last edited:
OP
OP
CyberNickOH

CyberNickOH

Well-known member
First Name
Nick
Joined
Jan 9, 2024
Threads
13
Messages
366
Reaction score
403
Location
Powell, OH
Vehicles
2024 Tesla CT AWD FS
Country flag
IMG_4940.jpg
IMG_4943.jpg
IMG_4944.jpg
IMG_4952.jpg
IMG_4957.jpg
IMG_4960.jpg
IMG_4962.jpg
IMG_4964.jpg
IMG_4966.jpg
IMG_4968.jpg
IMG_4969.jpg
IMG_4973.jpg
IMG_4974.jpg


This idea worked well. I got the link kits, cut two of the mounting brackets, and assembled the light bar. It is solid. I cut holes in two of the rubber plugs that come with the bumper and ran the Y cable harnesses though them. The connectors are very easy to take apart and reassemble.

This definitely looks better than having cables run across the bumper, but I wish there was a right angle plug because the bends look pretty extreme.
IMG_4940.jpg

IMG_4943.jpg
IMG_4944.jpg
IMG_4952.jpg
IMG_4957.jpg
IMG_4960.jpg
IMG_4962.jpg
IMG_4964.jpg
IMG_4966.jpg
IMG_4968.jpg
IMG_4969.jpg
IMG_4973.jpg
IMG_4974.jpg
That definitely looks like great solution. Damn me for being first I would have done that. If for some reason I have to take the bumper off again I’ll be doing this.
 

MICyber

Well-known member
Joined
Jun 29, 2024
Threads
7
Messages
211
Reaction score
218
Location
Michigan
Vehicles
2024 Cybertruck
Country flag
This idea worked well. I got the link kits, cut two of the mounting brackets, and assembled the light bar. It is solid. I cut holes in two of the rubber plugs that come with the bumper and ran the Y cable harnesses though them. The connectors are very easy to take apart and reassemble.

This definitely looks better than having cables run across the bumper, but I wish there was a right angle plug because the bends look pretty extreme.
IMG_4940.jpg

IMG_4943.jpg
IMG_4944.jpg
IMG_4952.jpg
IMG_4957.jpg
IMG_4959.jpg
IMG_4960.jpg
IMG_4962.jpg
IMG_4964.jpg
IMG_4966.jpg
IMG_4968.jpg
IMG_4969.jpg
IMG_4972.jpg
IMG_4973.jpg
IMG_4974.jpg
Hell yeah! that looks great, good work. Glad it worked out well. Take some pictures once you get everything install on the truck.

If you want to hide the exposed wires they sell wire harness felt tape on amazon.

https://www.amazon.com/XFasten-Residue-Free-Electrical-Automotive-Insulation/dp/B0D6NC7HZ8
 
Last edited:


personage

Well-known member
Joined
May 10, 2024
Threads
2
Messages
79
Reaction score
78
Location
IL
Vehicles
Cybertruck
Country flag
That definitely looks like great solution. Damn me for being first I would have done that. If for some reason I have to take the bumper off again I’ll be doing this.
Thank you for posting the photos. Would not have known to do this without you and
MICyber.

Have you noticed any impact on range since the new bumper?
 
OP
OP
CyberNickOH

CyberNickOH

Well-known member
First Name
Nick
Joined
Jan 9, 2024
Threads
13
Messages
366
Reaction score
403
Location
Powell, OH
Vehicles
2024 Tesla CT AWD FS
Country flag
Thank you for posting the photos. Would not have known to do this without you and
MICyber.

Have you noticed any impact on range since the new bumper?
Not something I’m all that concerned about so I can’t say. Plus it’s still cold here in Ohio so range is all over the board. I mean it’s quite a bit heavier so it has some impact, can’t image it’s more than another passenger.
 

Derektsla

Well-known member
First Name
Derek
Joined
Dec 13, 2023
Threads
18
Messages
359
Reaction score
857
Location
Greenville, SC
Vehicles
Cybertruck AWD, Model X
Occupation
Entrepreneur
Country flag
Ok, I finished install today (all but light wiring as I don’t have the harness yet.) I said earlier it took me 8 hours, it was more like 10, plus another 2-3 hours for final figment of all the under panels. That part was tough, as I couldn’t get things lined up and I had to do a lot of work to get it just right.

Here are some tips I have for those getting ready to install.
  • Buy a heavy duty socket swivel. I broke my swivel and will need to buy another to finish. There are 6 bolts that need 100ft-lbs and 2 absolutely need a swivel.
  • Watch all the videos all the way through before you start. There are a lot of little details it doesn’t hurt to see twice.
  • Set aside all the tools needed so you don’t have to fetch them at each step. I made a list in an earlier post. Especially make sure you have a 13mm wrench, short socket, and long socket. You will use them a lot.
  • If you don’t have 13 hours all at once, there is a lot you can do to prep before you tear apart the front of your truck. This includes, installing any the lights on the bumper, disassembling the winch and preparing the wiring, preparing the battery charger assembly, putting all the clip nuts on the skid plates, etc. I did some of these things in the evenings. it will speed up things later.
  • Expect to spend time adjusting the bumper alignment and skid panels near the end of the install. Could just be me. I have a low VIN, and I think my truck is a bit more out of spec.

  • Expect to have to figure out a few details in your own. There are points when they don’t tell you exactly what bolts to use or they skip a few small steps. I had to pause the video a few times and zoom in to see what they had done
  • Buy a hex socket set if you don’t have one. There is a lot of Allen wrench work
  • Finally, Do it with a friend. I did it 100% by myself, but it would be a lot more fun with a few beers in good company
    Tesla Cybertruck CTX Bumper / Wheels+Spacers / Black Matte PPF / Tint IMG_2981
    Tesla Cybertruck CTX Bumper / Wheels+Spacers / Black Matte PPF / Tint IMG_2977
 
OP
OP
CyberNickOH

CyberNickOH

Well-known member
First Name
Nick
Joined
Jan 9, 2024
Threads
13
Messages
366
Reaction score
403
Location
Powell, OH
Vehicles
2024 Tesla CT AWD FS
Country flag
Ok, I finished install today (all but light wiring as I don’t have the harness yet.) I said earlier it took me 8 hours, it was more like 10, plus another 2-3 hours for final figment of all the under panels. That part was tough, as I couldn’t get things lined up and I had to do a lot of work to get it just right.

Here are some tips I have for those getting ready to install.
  • Buy a heavy duty socket swivel. I broke my swivel and will need to buy another to finish. There are 6 bolts that need 100ft-lbs and 2 absolutely need a swivel.
  • Watch all the videos all the way through before you start. There are a lot of little details it doesn’t hurt to see twice.
  • Set aside all the tools needed so you don’t have to fetch them at each step. I made a list in an earlier post. Especially make sure you have a 13mm wrench, short socket, and long socket. You will use them a lot.
  • If you don’t have 13 hours all at once, there is a lot you can do to prep before you tear apart the front of your truck. This includes, installing any the lights on the bumper, disassembling the winch and preparing the wiring, preparing the battery charger assembly, putting all the clip nuts on the skid plates, etc. I did some of these things in the evenings. it will speed up things later.
  • Expect to spend time adjusting the bumper alignment and skid panels near the end of the install. Could just be me. I have a low VIN, and I think my truck is a bit more out of spec.

  • Expect to have to figure out a few details in your own. There are points when they don’t tell you exactly what bolts to use or they skip a few small steps. I had to pause the video a few times and zoom in to see what they had done
  • Buy a hex socket set if you don’t have one. There is a lot of Allen wrench work
  • Finally, Do it with a friend. I did it 100% by myself, but it would be a lot more fun with a few beers in good company
    IMG_2981.jpeg
    IMG_2977.jpeg
Nice work, looks good. Can’t disagree more. My friends were miller and lite. Not a terrible crew to have.
 

rtiql8n

Active member
First Name
Kirt
Joined
Sep 29, 2024
Threads
1
Messages
26
Reaction score
24
Location
Escondido
Vehicles
Tesla Model 3, Cybertruck on order
Occupation
Copier Technician
Country flag
Got the CTX bumper installed with 8 pod lights, all HXB, super winch SX12R, 22” CT7 wheels with wild peaks. Satin PPF wrap. Painted and decaled brakes. 1.5” wheel spacers as well. All from @T Sportline

Overall the CTX bumper system install is pretty straightforward. Videos for each step, with took me about 12 hours total. The kit comes with literally everything you need and tons of extras. The only thing I wouldn’t mind having were new push tabs as those break easily. I happen to have extras lying around, but some might not. You can install everything but 2 steps by yourself. The winch plate and bumper. Let me know what you think. I will be definitely adding the rear bumper and side step plates. Unsure on the bull bar, but we’ll see. Big thanks to Brian at @T Sportline for all the help getting the CT to look like this.

IMG_0301.jpeg
IMG_0303.jpeg
IMG_0302.jpeg
IMG_0304.jpeg
Dude! It looks so good. Nicely done.
Sponsored


Top