HandsomeYeti
Well-known member
Very interested to hear, thank youCT_AZ_4x4 is coming over this afternoon and we’re going to attempt to install it.
Sponsored
Very interested to hear, thank youCT_AZ_4x4 is coming over this afternoon and we’re going to attempt to install it.
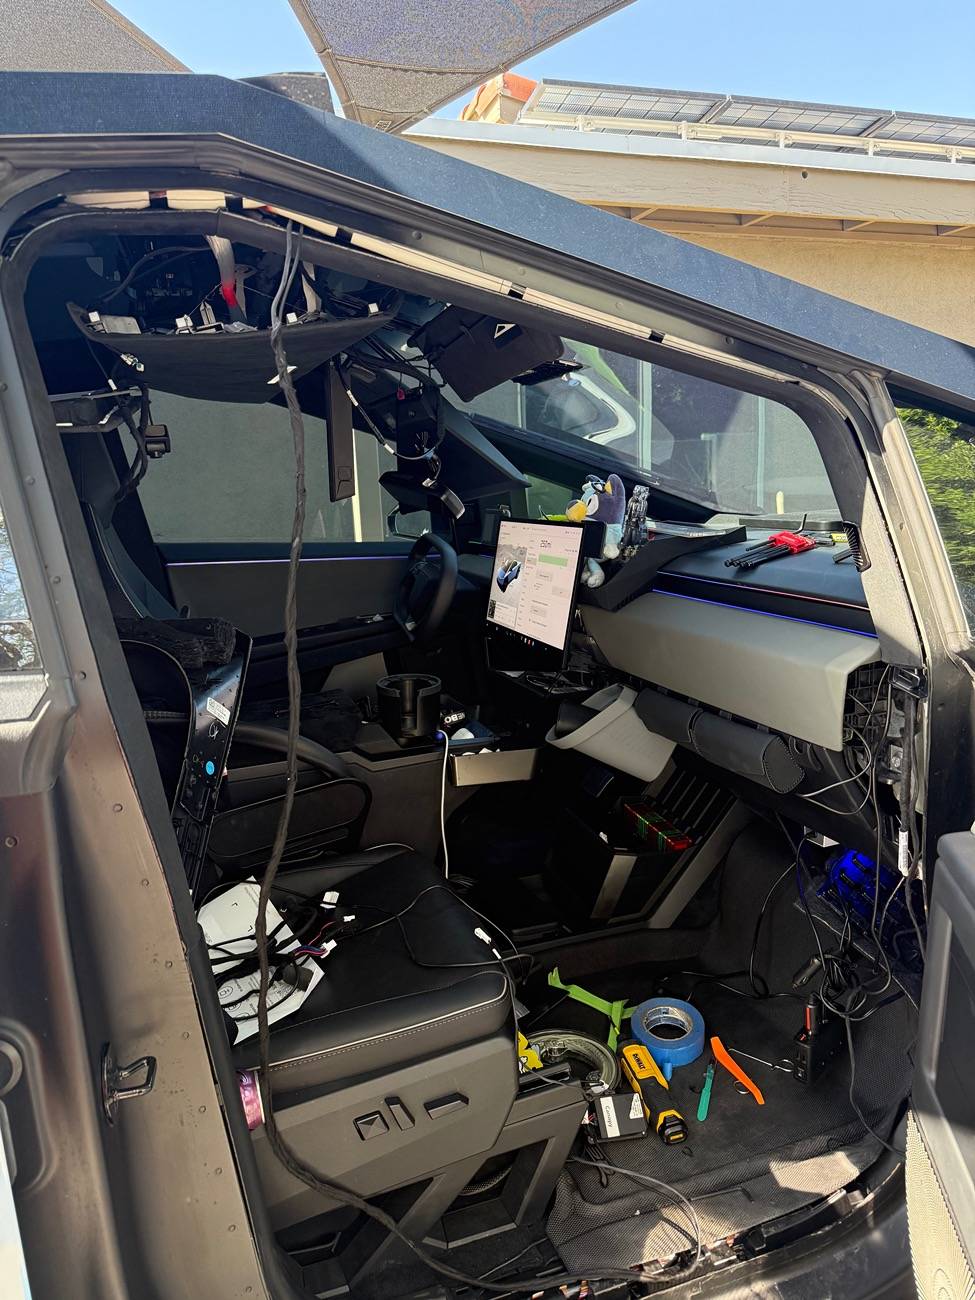
Great to hear. So just to confirm, you replaced the old harness with the new one, and the error message went away? Did you have to reset the screen or anything?Update: So good news. I have the thing wired in and it appears to run without the code. The bad news is I still have to figure out how to wire in my tesstudio starlight roof without causing the same error. Also, my car looks like a developing nation revolution inside. I’ll have to fix that too.
It came with zero instructions so @CT_AZ_4x4 and I spent the afternoon yesterday reverse engineering to figure out what to do.
I’ll try take some good photos today so I can help others moving forward.
Tesstudio did send a couple of pictures and a video after I asked but they don’t show anything useful I think. Happy to share those too if anyone needs them.

I bought the same mirror from Hansshow. The camera is mounted crooked in the triangle housing, the screen glitches out constantly when set to 2k, and you cant remove all the text on the right side of the mirrow. The arm is thin plastic and the mirror wobbles when you touch it, or you go over a bump. Not great.I just I installed this camera the other day and I love it! By far the cleanest looking install with the camera and housing all integrated!
https://cybertruckwraps.us/products...cam-2-0-for-tesla?_pos=1&_sid=8a321be69&_ss=r
Any luck? I’ve pretty much held off on pestering them until we’ve got some verification that it works.CT_AZ_4x4 is coming over this afternoon and we’re going to attempt to install it.
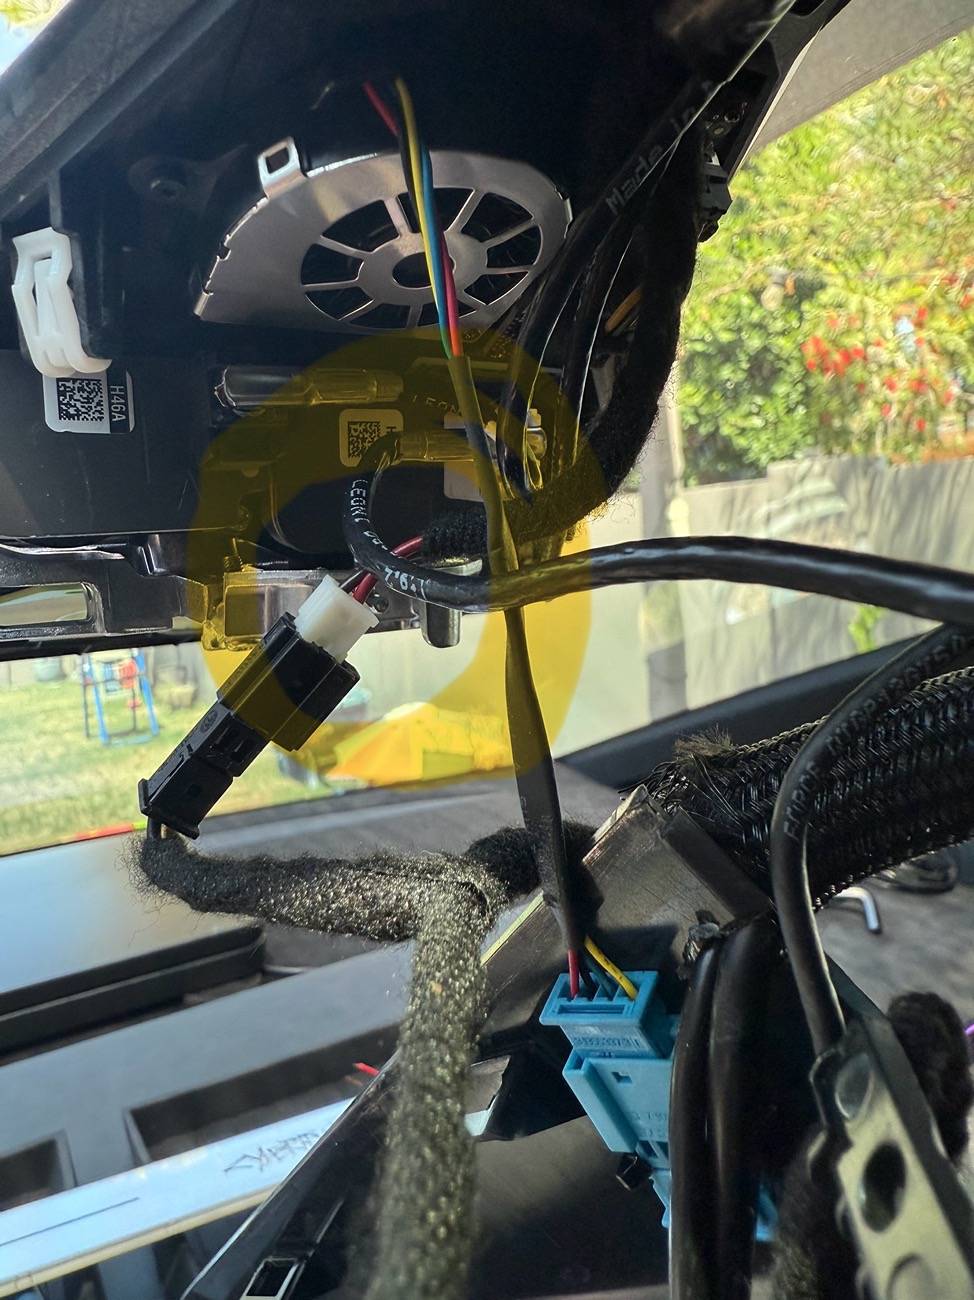
I did do a two button reset. The new harness takes power from a different place in the camera housing so it basically entails a reinstall but it does work. Here is a picture of where it plugs in.Great to hear. So just to confirm, you replaced the old harness with the new one, and the error message went away? Did you have to reset the screen or anything?
Interesting. Does the mirror still turn off with the rest of the truck when parked? That was the original benefit to going with this mirror over the Hanshow one. I thought it had to do with getting power from the wiring harness down by the passenger door vs up the gps/mirror.I did do a two button reset. The new harness takes power from a different place in the camera housing so it basically entails a reinstall but it does work. Here is a picture of where it plugs in.

I bought the same mirror from Hansshow. The camera is mounted crooked in the triangle housing, the screen glitches out constantly when set to 2k, and you cant remove all the text on the right side of the mirrow. The arm is thin plastic and the mirror wobbles when you touch it, or you go over a bump. Not great.
My camera is not crooked and I do not have a glitch…..however I did get one after going thru car wash and then it went away I guess as it dried. Will be waterproofing that joint. Anyone who has Cybertent has an advantage as that metal trim piece pops right off for the tent but that’s a sc install for the quick release buttons.I bought the same mirror from Hansshow. The camera is mounted crooked in the triangle housing, the screen glitches out constantly when set to 2k, and you cant remove all the text on the right side of the mirrow. The arm is thin plastic and the mirror wobbles when you touch it, or you go over a bump. Not great.
Yes. The new harness wires into EXACTLY where he did freehand in his writeup.Any luck? I’ve pretty much held off on pestering them until we’ve got some verification that it works.
Yes it does. Only power comes from this part of the harness.Interesting. Does the mirror still turn off with the rest of the truck when parked? That was the original benefit to going with this mirror over the Hanshow one. I thought it had to do with getting power from the wiring harness down by the passenger door vs up the gps/mirror.
Interesting because the harness looked pretty big. How’s the fitment? Did everything go back together ok. I have to say I’m not real thrilled with having to pull the wires back through that I ran the first time but I would like the error to go away so… ??Yes it does. Only power comes from this part of the harness.
Interestingly not when plugged into level 2. Heads up.

I agree. Not what I was expecting.Interesting because the harness looked pretty big. How’s the fitment? Did everything go back together ok. I have to say I’m not real thrilled with having to pull the wires back through that I ran the first time but I would like the error to go away so… ??
So just to confirm if I am reading your post correctly, this new harness connects to the plug in the truck camera housing, the plug in the footwell connector, and the camera wire?Alright everything now works without the code. Here is my suggested procedure how to do this. This is what I did. Your mileage may vary. Bear in mind I have absolutely no relationship to tesstudio other than that I also bought this mirror from them like you.
1. Remove the door gasket and two access panels next to the glovebox as in the prior install.
2. unplug prior harness and trace wire towards the optical camera plug. I pulled my headliner down for this but you may not have to if you can reach it from the windshield side with your fingers.
3. Unplug the camera cable and plug in the optical cable for the new harness.
4. remove mirror mount very carefully. I think this is a t20 or t25 but need a longish one so you can reach for it through the split in the mount look directly up at at it from where you’d expect the shifter of an ICE car.
Consider a magnetic tool because it’s VERY easy to drop this screw. Also, no need to pull it all the way out. Just enough to drop the mount. Put a piece of painters tape over the same split in the mount to avoid the screw falling out while your back is turned.
the wires are kind of in the way of the screw head, push them towards the back of the car with a trim tool to expose the screw head.
5. Remove the FSD camera housing carefully and let it dangle there. On the inside of the housing attached to the plastic is a connector on the drivers side. Unplug it and plug in the two bridging plugs on the new harness. There is only one way these fit so just look at the connectors.
6 . test system. Makes sure you are NOT plugged into a level 2 charger. Press the brake pedal and wait about 5 seconds. Mirror should power up but give a warning about shutdown in 5 seconds because it’s still not getting signal that the car is “on” from the footwell connector. It should then turn itself off.
6. Trace the harness back to the footwell hiding it in the trim as you go while removing the old harness.
7. once you get to the bottom where the connectors are, plug in the new connectors and discard the old harness.
8. test the system again. Should work as intended and stay on till the car powers off.
Don’t forget there is a power button at the bottom of the mirror if it doesn’t start up.
9. hold steering wheel buttons until car reboots.
10. check service menu to ensure audio alert is gone.
11. reattach the mirror. Plan to get an extra pair of hands with this. It’s an enormous pain in the ass. Try not to drop the screw.
12. Neaten up the wires and replace all trim
And….your uncle is Bob